

Rohloff hubs require a very specific wheel build. You need to make sure the mechanic you use is up to the job.
Having had our wheels built many times now (and many times incorrectly), I have learned the what’s what of building a Rohloff wheel.
I have used spokes and nipples which are inappropriate for Rohloff wheels; this has resulted in a lot of frustration. I have used rims which are not up to the task of loaded touring (*cough* Mavic *cough*). I have visited mechanics who think they know everything about wheel building, but really, they don’t know the important information I’m about to spew out.
I hope this guide to building a strong Rohloff wheel saves you much frustration and provides you will infinite kilometres without any problems.
1. Find the Best Wheel Builder within 500km
– You’ll want someone who has a reputation for building great wheels. Ask around. If they’ve built a Rohloff before, they might know how to do it just as well as explained here. However, it could be worth printing off this page and handing it to your builder anyway – just in case.
– A good wheel builder will be able to build a wheel with even tension on every spoke. The more even the tension, the stronger your wheel will be and the longer it will last. Super awesome builders will measure spoke tension precisely and can even analyse the tension data.
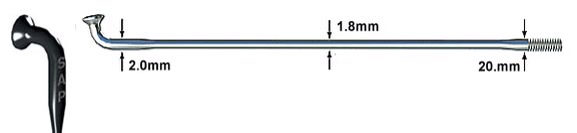
2. Sapim Race or DT Swiss Competition Spokes (2.0-1.8-2.0mm)
– It is essential to use spokes no larger than 2.0mm in diameter. Anything larger (eg. 2.3mm) can damage the hub body of the Rohloff. Using this larger spoke size voids a Rohloff warranty, so don’t do it.
– Double-butted spokes are great because they have a higher tensile strength per mm2 compared to basic spokes. Sapim Race spokes are said to be a bit stronger than DT Competition.
– Silver and black spokes are the same strength. The black on spokes is an oxide coating (not anodising), so it is purely costmetic and not structural.
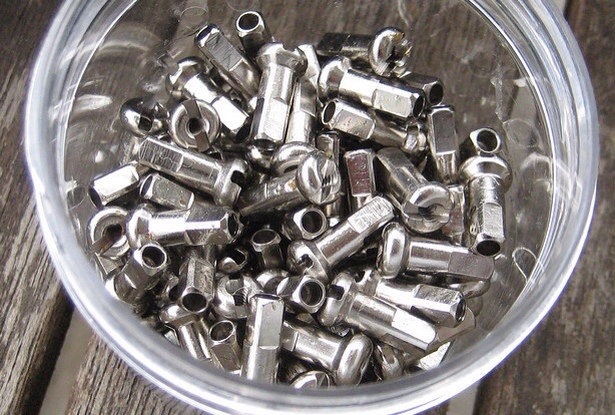
3. 12mm Brass Nipples
– Brass nipples are simply strong and durable. Their nickel plating provides great corrosion resistance against wet and salty conditions. Brass nipples also have a lower friction to the spoke compared with other nipples.
– The rule with nipples is to make them short as possible, but long as necessary. With most touring rims, there is no need for anything longer than 12mm.
– Make sure you use name brand nipples such as Sapim or DT. I have had some terrible wheel builds in Central Asia using cheap nipples.
– Skip alloy nipples. They can build a strong wheel, and they are 1/3 the weight of brass, but they are much easier to round-out after a few tune ups.
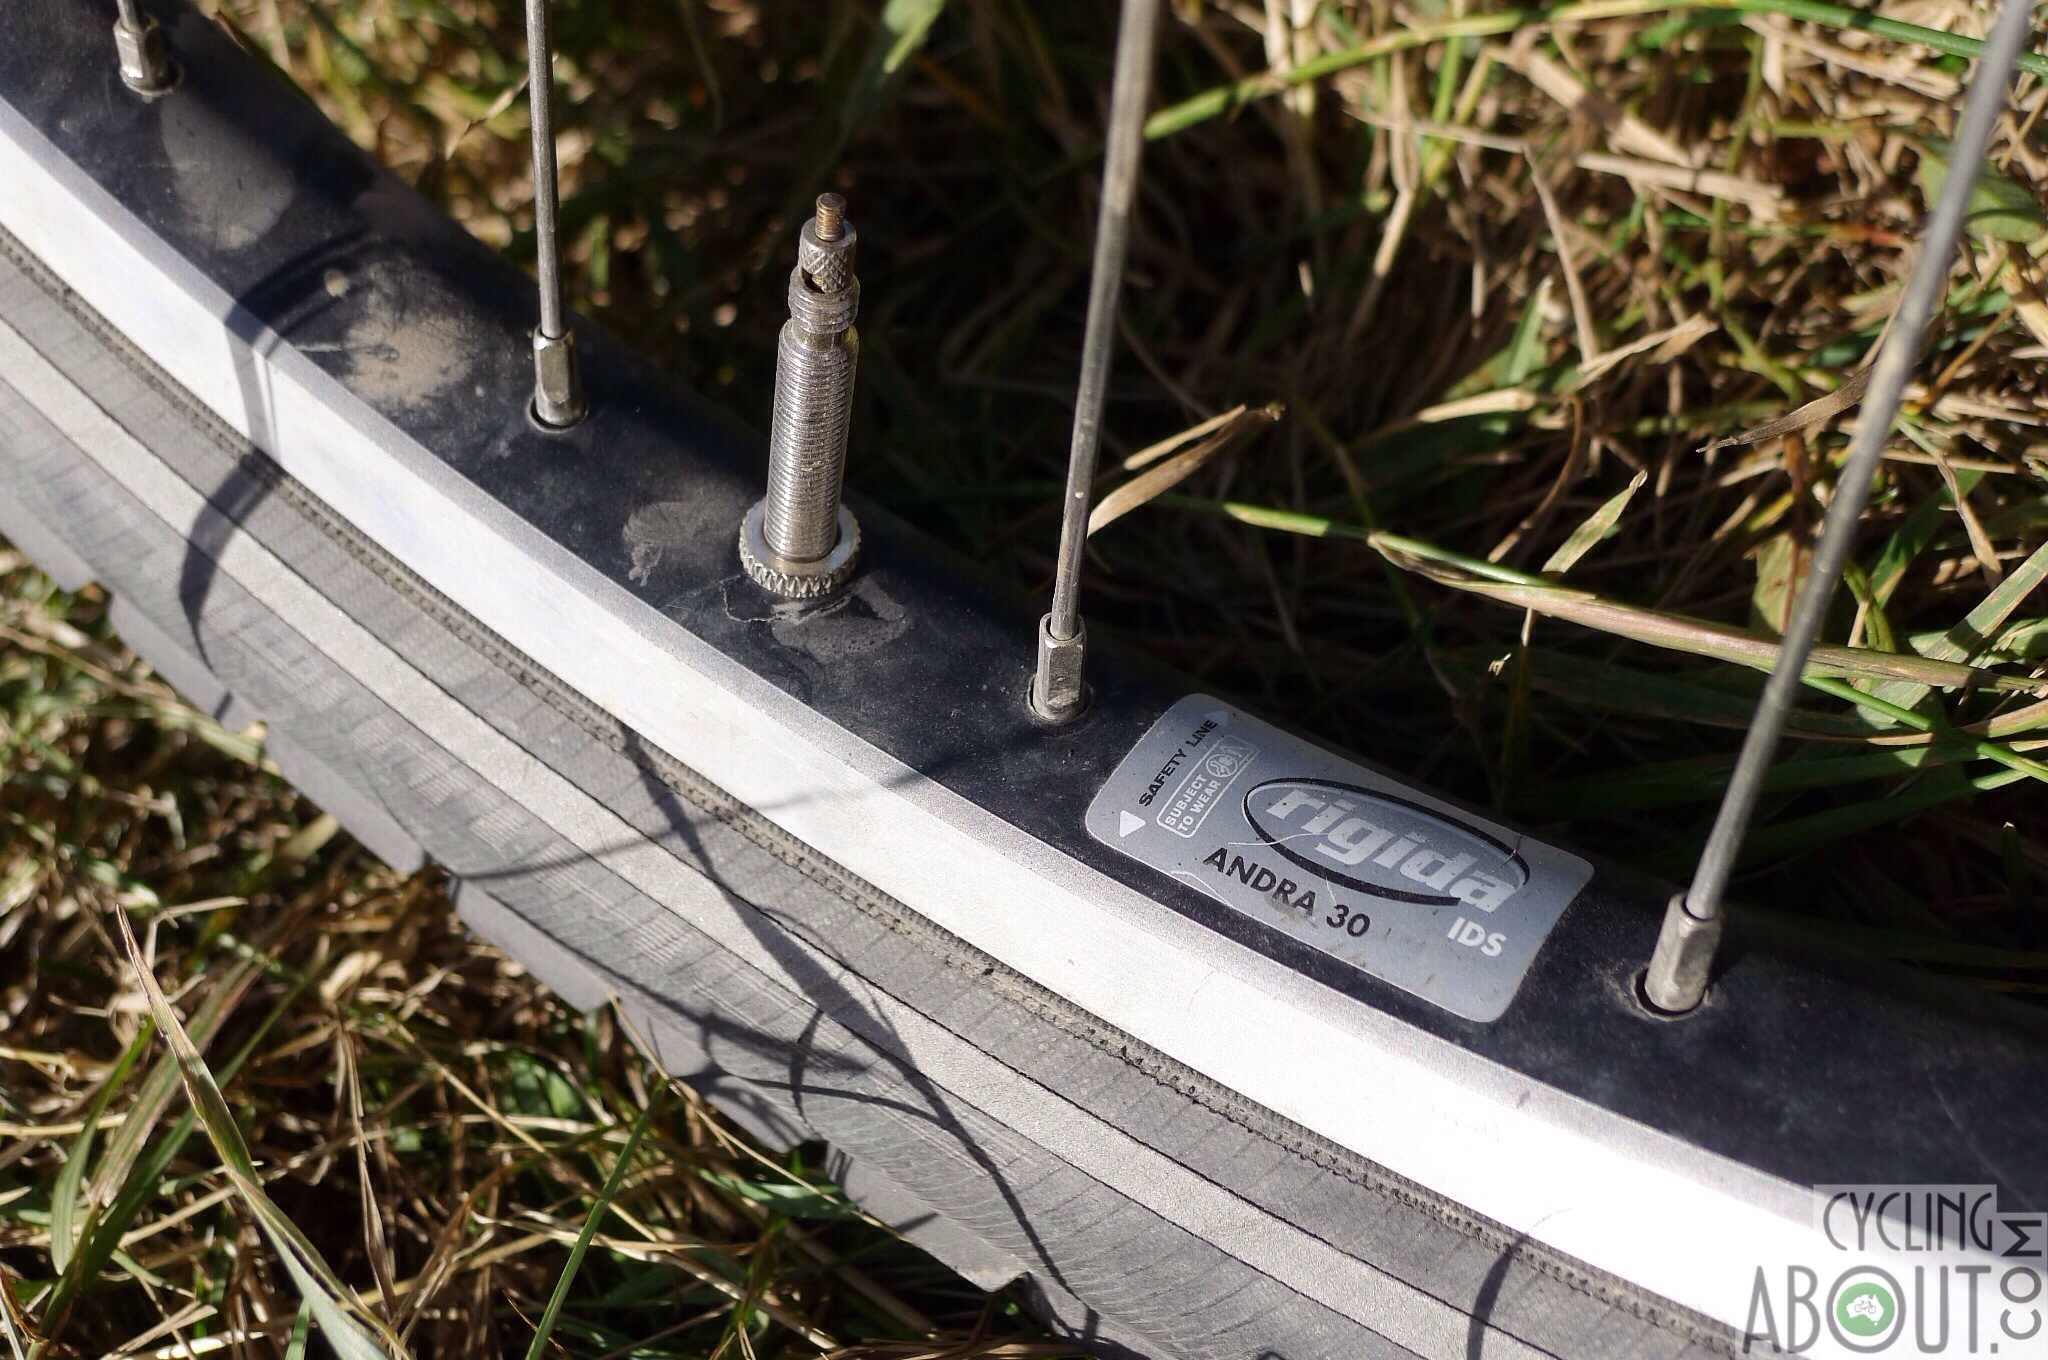
4. Use a Super Tough Rim
– The toughest rim you’ll find is the Rigida/Ryde Andra 30. It weighs 735-810g, but the weight just doesn’t matter on a loaded touring bike – reliability is king. I have a review available on the Andra 30.
4a. If You’re Using 26″ Wheels…
– Make sure you use Ryde rims! The Andra series rims have spoke holes which are drilled on an angle for Rohloff hubs, providing a much more direct spoke angle to the hub.
– The spoke length you most likely require is 238mm for a 32h Rohloff.
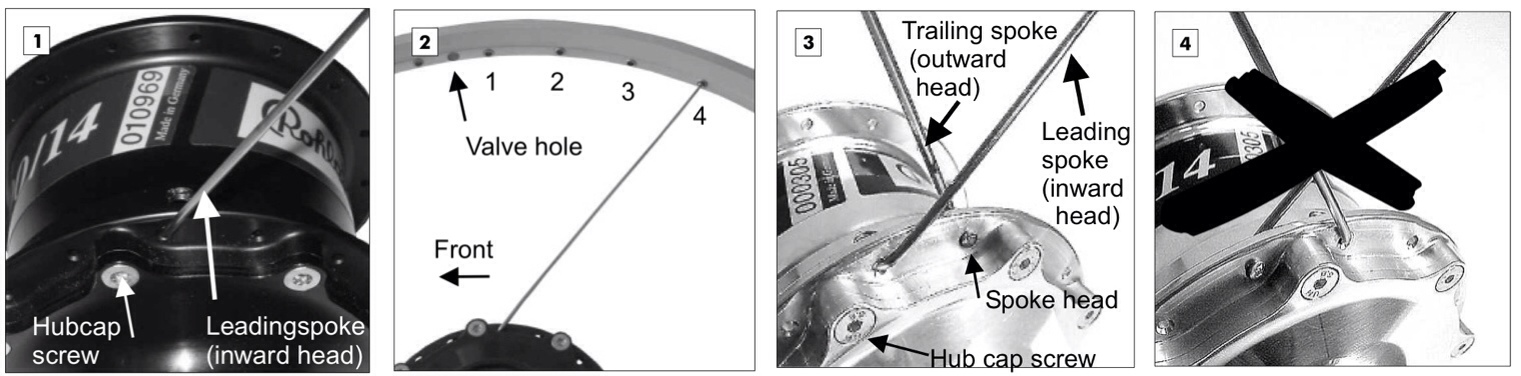
5. Get the Lacing Right
There are a few rules to follow…
– 2x lacing pattern only for 26-28″ wheels – do not listen to a builder who insists on lacing it 3x because it’s stronger.
– 1x lacing pattern only for wheels 24″ and smaller.
– Leading spoke has an outward head.
– Trailing spoke has an inward head.
– It’s best not to cross over the hubcap screws although it is permitted (it isn’t permitted for wheels 24″ and smaller). If you’ve had your 26-28″ wheel laced over the hubcap screw, this shouldn’t be a problem in terms of durability. When getting it relaced in the future, it will actually be best to keep lacing it this way so that additional new stresses aren’t put on the hub flanges.

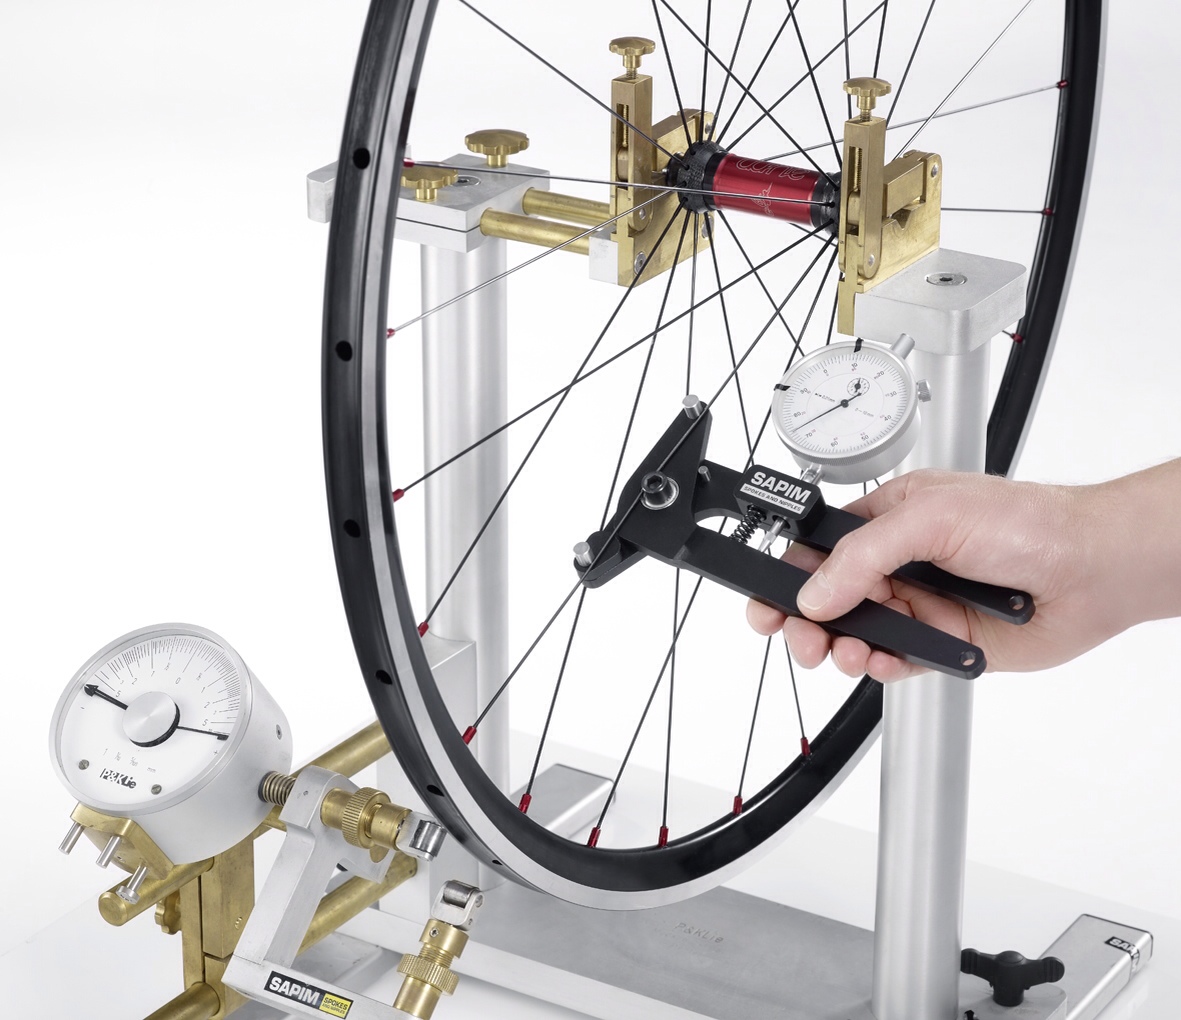
6. Get the Tension Right
– You’ll want the spoke tension even across all spokes if possible. The most ideal tension for this build is between 1000-1200nm (101-122kgf).


Excellent info! The hard part is to find that wheel builder…
An other great article.”The hard part is to find that wheel builder”:we don’t have that issue here in Vancouver,BC,Canada.Just to name two shops:”Mighty Riders on Broadway street and Dream Cycle on Commercial drive” if you ever happen to be around.
Very Informative Thanks.
Would spoke length of 238mm for a 32h Rohlof also apply to a 36 h Rohloff with 26” Ryde Andra 30s probably not right :)? Any idea I find this info hard to get.
Hello Ty
According to this document, a 36h Andra 30 will need spokes with a length of 234mm. That said, it’s always worth doing a manual calculation with the components first.
http://www.rohloff.de/uploads/media/ENGLISH_OEM_36_2013.pdf
Alee
Thanks For the info Alee
I am thinking 234mm right now
Thanks again, great info! I have been searching for this kind of detail.
Another question 🙂
When I look at 36h Andra 30 it seems like all versions come with Rohloff specific spoke holes (i.e with the angling) that is, one does not need to make this specification when ordering. I am planing for SON hubs in front, I think they would work with Andra 30s fine as-well even with the slight bias towards big Rohloff hubs, I mean the spokes would not be out of alignment weakening a SON dynamo front wheel with Andra 30s.
it this your impression as-well? If you have one 🙂
Ty
You can get regular drilling 36h rims here: http://www.sjscycles.co.uk/rigida-andra-30-26-(559)-mtb-css-rim-black-36-hole-regular-drilling-prod18846/?geoc=au
I see, Thanks again. This must be specified.
Alee, can you use a Rolhoff Superhub on 16″ wheels on a small trike?
I bought a recumbent tandem last year and was looking for the best
way to get a strong and durable rear wheel and this site helped me.
But
after spending a lot of money to get the wheel built by a Rohloff
contractor, I think now that the best way to get a good wheel is to
build it yourself.
In fact I’m not really fan of bike mechanics but I
found it pretty easy (and it took me “only” five hours) to build my
first wheel, just following the book
http://www.wheelpro.co.uk/wheelbuilding/book.php (I bought this one but I
think there are others).
My first wheel is not a Rohloff one but
it’s as true as the professionally built one, and it doesn’t cost that
much in equipment (about 70€), especially regarding the price of the
Rohloff hub. And Rohloff makes really good documentation, so read it
carefully and do it yourself.
Moreover, if you end up with a broken spoke it will be easier to repair.
I’m building a Rohloff touring bike and these lacing patterns confuse me a bit. Is 2 cross also better with disc brakes? Others say 3 cross is better for torgue forces that disc brake causes but I don’t know. I’m also getting a Son 28 for front and the wheel size will be 700c. I chose Ryde Andra 210 36 hole for Rohloff and Ryde Taurus 19 32 hole For Son. What would you guys suggest for the lacing?
Hi Timo.
The concern is with the spoke angle at the rim. Due to the large flange diameter of a Rohloff hub, the spoke/nipple angle is at the extreme of what’s acceptable with a three cross pattern, in turn becoming a weak spot in the wheel build. A two cross pattern offers much less stress at the nipple. The Ryde Andra Rohloff drilled rim reduces the angle even more.
I’d recommend building the SON front wheel with a three cross pattern.
Alee
Thank you for the advice. This site has been very helpfull and inspirational.
Great to hear! All the best with your wheel builds.
If you are in New Zealand you can’t go wrong with Wheelworks http://wheelworks.co.nz/ (search “Rohloff” for Rohloff builds.)
I am a big 130kg (286lbs) rider and I am closing in on 20 000km on my Ryde Andra Rohloff 32h rims on my Thorn Nomad and I have not had one single problem. On a short (900km) ride from Auckland to Wellington (NZ) via The World Forgotten Highway I asked Wheelworks if I should carry spare spokes and I was told “no, unless you have an accident you will not break any spokes.”
I do not work for or have any affiliations with Wheelworks (other than being a customer), but just as a matter of interest, people seem to love their wheels, as they are sent to buyers literally all over the world, including the UK, USA, Australia and South America, so it isn’t just me who trust them. I hope I don’t sound too OTT about mentioning them, but it was such a relief to find someone who could build reliable wheels for someone my size. When I go riding, I do not have to give my wheels a second thought and that is how it should be.
I used to break spokes all the time in the 1980s when I rode road bikes and it was a real pain.
Tony
http://www.instagram.com/nztony62
Thanks for sharing your experience, Tony!
Good article. However, I would add that, having built my own Rohloff wheel and replaced several rims over the years as they have worn out, there is no good reason why 26″ wheels have to be laced 2x IMHO. Unless the rim is drilled specifically for Rohloff (eg Rigida Andra) you are better off lacing 1x to prevent excessive stress to the nipple end of the spoke due to the acute angle that the combination of a smaller rim and a large hub flange produce. I have broken many spokes this way.
My temporary fix on a 2x wheel with a non-Rohloff drilled rim was to use a drill shank to bend force each rim eyelet more inline with the angle of the spoke as I laced the new rim. But the best solution is to lace 1x in the first place.
Rohloff’s reason for using 2x? “Cos that’s what we recommend” is their answer! No other reason!!!
What’s your logic in under-inflating a tyre on a loaded touring bike? In what way do the rims fail if you don’t? The pressure in the tyre barely changes with vertical load; this is why you can inflate a car tyre to the desired pressure when off the vehicle, and then put it on, and the pressure will still be correct. I’m stumped.
Those are not under-infated pressures. The pressure rises with tires size and it is easy to damage the rim going any higher than those figures. For some info about this … here is a document from arguably the people who sell more Rohloff equipped bikes that anyone else, SJS Cycles. Page seven has the info about tire pressures. http://www.sjscycles.com/thornpdf/ThornBikeOwnerManual2Web.pdf
So the point is not specifically about a touring wheel then? All rims will fail if you put too high a pressure in the tyre, and the hoop stress increases with tyre width, so this is why you can’t run a 2″ wide tyre at 120PSI.
Any suggestions on a good builder?
If you live in Melbourne, Australia – feel free to email me for a contact.
You want to update the spokes section to note that you now need to get Rohloff-specific spokes, which I think only Sapim still makes. From an email with Rohloff customer support, August 2017: “Please make sure you use the correct spokes. Spoke manufacturers have, in recent years, changed the length of the spoke neck supplied as standard – without informing the public. The SPEEDHUB still requires spokes with a 2.9mm neck length. If you dealer is unable to supply these, then please ask that they source them from us (or our distributors) directly. “
Thanks for this information. I hadn’t heard that before.
Yes I just found out about that last night as I was researching a new wheel build for my Rohloff. So, currently, spokes all have to be ordered through Rohloff distributors which is a bummer. I spoke to a local distributor this morning ad they didn’t have the size I was after.
Several Rohloff wheel builder’s I talked to yesterday and today didn’t know this, and nor did one person I spoke to at a Rohloff distributor, which is a worry.
I just spoke spokes with the Australian Rohloff dealer. Though I’d like Sapim or DT spokes the only spokes available through Rohloff distributors are sold as “Rohloff spokes” and the Aussie dealer doesn’t know who they’re sourced from. I’m supposing Rohloff would get the best they could but it’s a mystery. And because of this 2.9mm neck thing, there seems to be no choice anymore. I’ve had a pretty thorough look but would love to know if I’ve missed some info
Also, on the subject of info, are you across the Rohloff Flange Support thing? I haven’t seen anything yet on your site. http://www.rohloff.de/en/company/news/news/flanschringe/
Yep, it’s a problem. There’s only one Rohloff distributor in the United States (Cycle Monkey). I placed an order for these spokes on Sept 22, and they just got them today, Dec 7. Seventy-six days to get a part without which their core product is useless, in the largest economy in the world. In the meantime, my Rohloff-based frame, my favorite bike, is hanging in the garage with no wheels (several spokes on it had broken mysteriously, which is another story). And who knows how many wheels have been built with standard spokes that, in the words of their tech bulletin on the subject “have and continue to lead to damage around the spoke neck which can eventually lead to flange failure”. I want to like Rohloff, but they really severely messed up the rollout on this one. I’ve emailed with them them about it, several times. The conversation summary is essentially me saying “you have this new requirement, but no one has the spokes and hardly anyone knows about it”; and Rohloff support is like “thanks for the feedback, sorry for the inconvenience.” It would super suck to break a couple of spokes on a long tour and have to wait two months to get replacements, or risk flange failure on your $1200 hub by using standard spokes. Link to bulletin: http://www.identitibikes.com/ison/uploads/1501230633_Rohloff-Spokes-info.pdf
Thanks for the bulletin link Joe. It answers a question I’d put to Rohloff AG in Germany, who ignored it. I’d asked if the Rohloff supplied 2.9mm Neck spokes were Sapim (or DT). I believe these Rohloff spokes are available in the length I need but I better check that out so I can attach that Flange Support sooner, on an ideal wheel, instead of the thing I’m riding around on.
Now here’s something very interesting from Paul Moir, the Australian Rohloff Distributor re Lacing, in which he says that the best Rohloff Lacing is not even 2 cross overs but 1, and a link to the Facebook page where he has diagrams. I’ve asked him to confirm that this is best and asked why but am yet to hear back. Apparently it freaked people out – but it the physics supports this as the ideal, I want it.
WHEEL LACING PATTERNS
As explained, the more often a spoke crosses, the force from the rim will be directed into the flange further outward thus having less direct influence on flange stability. The greater angle created however will cause the spoke to enter the rim at a more obtuse angle. Rims are drilled to permit a certain amount of nipple movement so that the route from spoke to nipple remains as straight as possible. If the spoke entry angle is too obtuse, spokes will kink at the nipple join and this kink will lead to premature spoke failure. The situation is made worse when using hubs with a large spoke P.C.D. such as the Rohloff Speedhub and worse still when using modern rims with eyelets – where eyelets are reduced in diameter below 4.4mm (to save vital steel weight) so that the nipple has even less space to angle itself in the direction of the spoke. The ideal spoke lacing pattern for the Rohloff Speedhub wheel is actually 1-cross, although our customers would not accept this when the Speedhub was first introduced. Hence our recommendation remains a 2-cross lacing pattern for wheels of 26 inch diameter and larger (see image link below showing the spoke entry angle for a 1-cross Speedhub wheel laid over that for a typical 3-cross derailleur wheel).
https://www.facebook.com/rohloffaustralia/photos/pcb.219140375246148/219129985247187/?type=3&theater
The Australian Distributor says
SPEEDHUB WHEEL STRENGTH & STABILITY
When the Rohloff SPEEDHUB 500/14 is built up (32 or 36 spoke wheel), it is considerably stronger than typical 36 spoke wheels. The stability is similar to that of a 48 spoke tandem wheel.
The spoke flanges of the Rohloff SPEEDHUB 500/14 are constructed symmetrically. This allows all spokes to be at the same angle on both sides of the finished wheel, which results in a much stronger wheel due to the evenly distributed spoke tension. To build a strong Rohloff wheel, the spokes must be tensioned to a minimum of 1000N (with inflated tire). The typical derailleur rear wheel needs to be dished to accommodate the room required by the cassette…. this creates a huge difference in spoke tension. The tension on the dished side is usually considerably higher (over 1200N) and this can lead to problems with the spoke nipples sitting correctly within their seats in the rim (see image attached, pretension in the “8-speed rear hub” here is only 600N).
Due to the increased diameter of the hub flanges and PCD of the Rohloff SPEEDHUB 500/14, the spokes need cross only two times, but do so roughly at the same angle as a three cross lacing pattern on smaller flanged hubs. There is less load on the spokes because of the large flange PCD diameter and the hub flange is subjected to lower forces because these spokes pull further away from the axle center, creating a better lever to pull the wheel around (torque = force x lever length).
The same image shows the maximum spoke loads (numbers in brackets are the pre-tensioned forces of spokes after lacing).
WHEEL LACING PATTERNS
As explained, the more often a spoke crosses, the force from the rim will be directed into the flange further outward thus having less direct influence on flange stability. The greater angle created however will cause the spoke to enter the rim at a more obtuse angle. Rims are drilled to permit a certain amount of nipple movement so that the route from spoke to nipple remains as straight as possible. If the spoke entry angle is too obtuse, spokes will kink at the nipple join and this kink will lead to premature spoke failure. The situation is made worse when using hubs with a large spoke P.C.D. such as the Rohloff Speedhub and worse still when using modern rims with eyelets – where eyelets are reduced in diameter below 4.4mm (to save vital steel weight) so that the nipple has even less space to angle itself in the direction of the spoke. The ideal spoke lacing pattern for the Rohloff Speedhub wheel is actually 1-cross, although our customers would not accept this when the Speedhub was first introduced. Hence our recommendation remains a 2-cross lacing pattern for wheels of 26 inch diameter and larger (see the diagram below showing the spoke entry angle for a 1-cross Speedhub wheel laid over that for a typical 3-cross derailleur wheel).
The examples shown in the image attached of the 3-lacing patterns are for a 20 inch wheel (as originally drawn in full-size). The fact that the angle increases with the number of spoke crosses however, remains the same regardless of wheel diameter (note that the spoke entry angle for a 1-cross, 26 inch Speedhub wheel is 5.0° and a 3-cross, 26 inch derailleur wheel is 4.5°).
As you can see, the 1-cross Speedhub and 3-cross derailleur spoke angles are identical and therefore both offer equal flange stability if laced and tensioned with the correct spokes. The Speedhub however remains the laterally stronger wheel of the two, due to the equal spoke length and symmetrical lacing of the un-dished wheel (this permits even spoke tension throughout the build).
Hi again Alee,
Have you see my reference to this, from Paul Moir, the Australian Rohloff distributor? It’s about the ideal Rohloff Wheel lacing pattern being a Single Cross. I’ve been looking for confirmation before I build my next wheel but haven’t received a reply yet.
“WHEEL LACING PATTERNS
“As explained, the more often a spoke crosses, the force from the rim will be directed into the flange further outward thus having less direct influence on flange stability. The greater angle created however will cause the spoke to enter the rim at a more obtuse angle. Rims are drilled to permit a certain amount of nipple movement so that the route from spoke to nipple remains as straight as possible. If the spoke entry angle is too obtuse, spokes will kink at the nipple join and this kink will lead to premature spoke failure. The situation is made worse when using hubs with a large spoke P.C.D. such as the Rohloff Speedhub and worse still when using modern rims with eyelets – where eyelets are reduced in diameter below 4.4mm (to save vital steel weight) so that the nipple has even less space to angle itself in the direction of the spoke. The ideal spoke lacing pattern for the Rohloff Speedhub wheel is actually 1-cross, although our customers would not accept this when the Speedhub was first introduced. Hence our recommendation remains a 2-cross lacing pattern for wheels of 26 inch diameter and larger (see image link below showing the spoke entry angle for a 1-cross Speedhub wheel laid over that for a typical 3-cross derailleur wheel).”
https://www.facebook.com/rohloffaustralia/photos/pcb.219140375246148/219129985247187/?type=3&theater
This appears in full here, where Paul first bought it up with me and others
http://www.bicycles.net.au/forums/viewtopic.php?t=93757
then at the Facebook link just above. I’d be interested to know your thoughts.
I’d be lining up those spare spokes well in advance and maybe through a European seller. Don’t forget to put flange rings on too. Rohloff says all speed hubs should be fitted to avoid flange failure.
Have you come across this? https://www.crazyguyonabike.com/forum/board/message/?o=1mr&message_id=232588&v=1B
I have Mavic XM 719 rims and I’ve never had problems with them, but now I’m considering changing the rear rim to ryde andra 30 to be on the safe side cause I’m planning on going on a big tour, so this is not exactly what I wanted to be reading now :/
I think you’re safe with that decision. There are thousands of people who have experienced no problems with these rims on long-term bike trips, myself included.
Are you sure it’s 234? I checked and it seems to be 232. The ERD for Andra 30 is 535. https://www.rohloff.de/fileadmin/user_upload/Manual_2017_11_web_En.pdf
I checked on the old document that you referred to as well but it gives the same result: https://www.rohloff.de/fileadmin/_migrated/content_uploads/ENGLISH_OEM_36_2013.pdf
I’m asking because I’m in the process of changing the rim and I was hoping not to have to buy new spokes as well. What I have are 232mm long.
232mm will be fine.
So Joe, did you get your flange rings? I was holding out for my trike project, when I’ll mid-mount my Rohloff on the frame of my Electric Cargo Trike (with two of Ryde’s strongest Andra 40 Rims at the back ( rated to 180kg and eBike 45kph) and Sapim ‘Strong.’ But yes, I thought about wrecking my Rohloff and the cost of hiring a work vehicle while waiting for a new Speedhub ….
So I just put the Flange Rings onto the Rohloff and rebuilt it with those Rohloff (Sapim) Double Butted spokes (on my old Rhyno Lite rim) and damn I’m glad. It cost about $175 at Omafiets, Sydney, and my rear wheel is now a lot stronger, if not yet officially bullet proof.