

With dynamo hubs, lights and chargers becoming better by the day, I’ve been getting a lot of inquiries about how to wire up the best hub dynamo system. Now, I won’t be going into the detail about each individual component, rather this resource is about understanding the hub dynamo system as a whole. Here you’ll find information about the plugs, connectors and other products that are designed to build a better hub dynamo system.
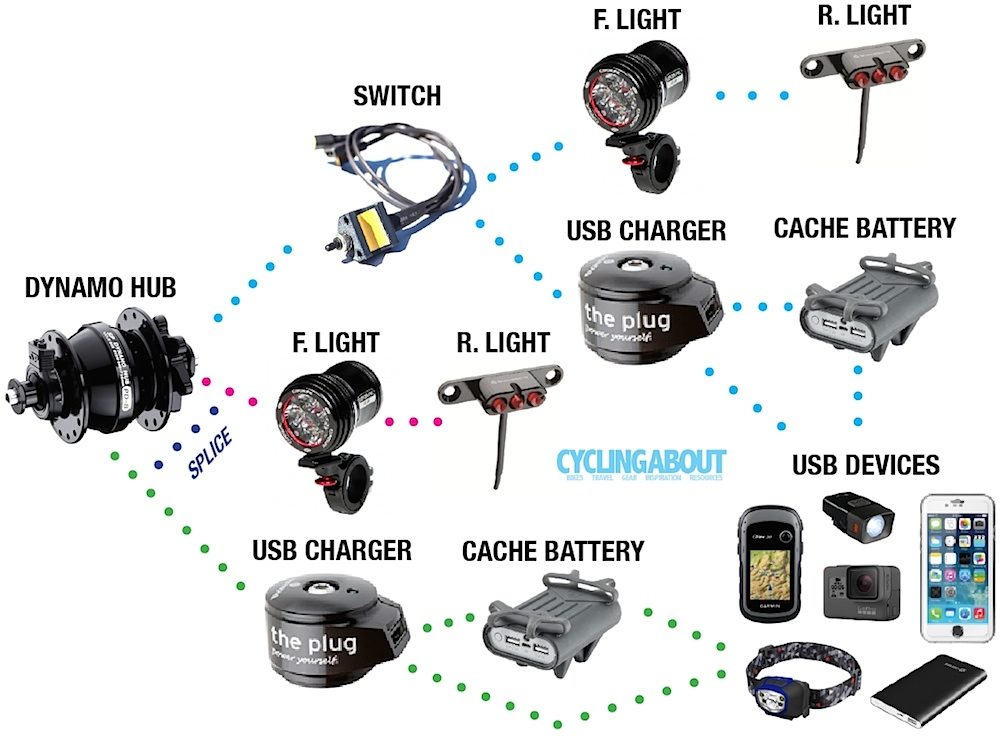
Let’s start with a component map to understand how everything pieces together.
Hub Dynamo System Map
Dynamo Cabling
Spade Connectors
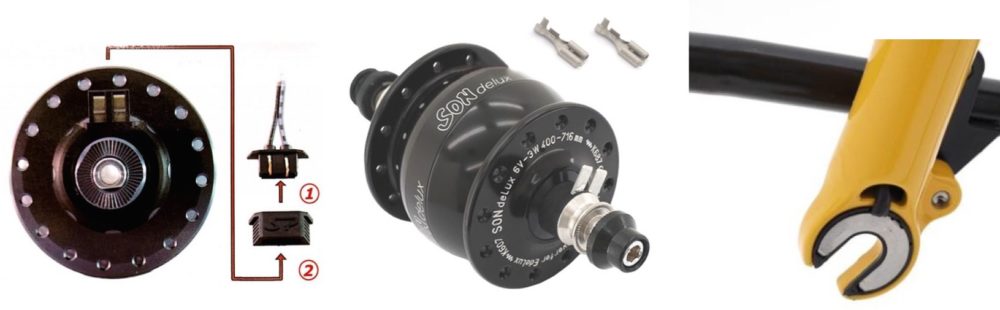
Most dynamo hubs spit out their power via two spade connectors at the axle.
There are two different common forms of spade connector – the Shimano design and the Schmidt SON design. Neither design can be said to be ‘better’ – they both do the same job of transmitting power up the cable. Due to the market split of connector types, dynamo lights and USB chargers tend to come without any connector attached to the cable ends.
A less common connector design is the Schmidt SL fork dropout. This is a really neat design; the connection happens between the edge of the hub and a fork dropout plate that’s soldered to the wiring. Unfortunately, you’ll rarely find the Schmidt SL dropout on anything but custom-built forks.
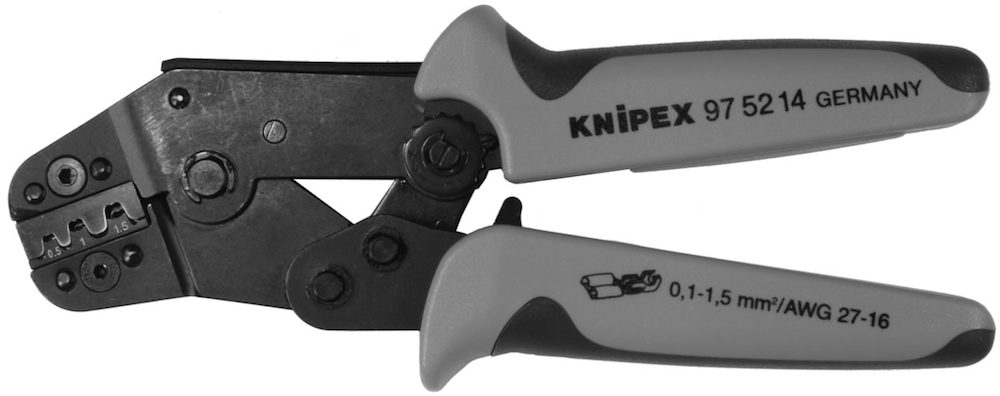
Fitting Schmidt Hub Spade Connectors
A crimper tool is an ideal way to fit Schmidt spades to bare wires. With a good crimping, the dynamo cable will look neat and be fixed very firmly to the spade. It’s a really good idea to use a bit of heat shrink over the spades to protect them against the elements (they can corrode). At a pinch, I’ve used a pair of pliers to connect spades, but you won’t get that nice spade curl without a crimper.
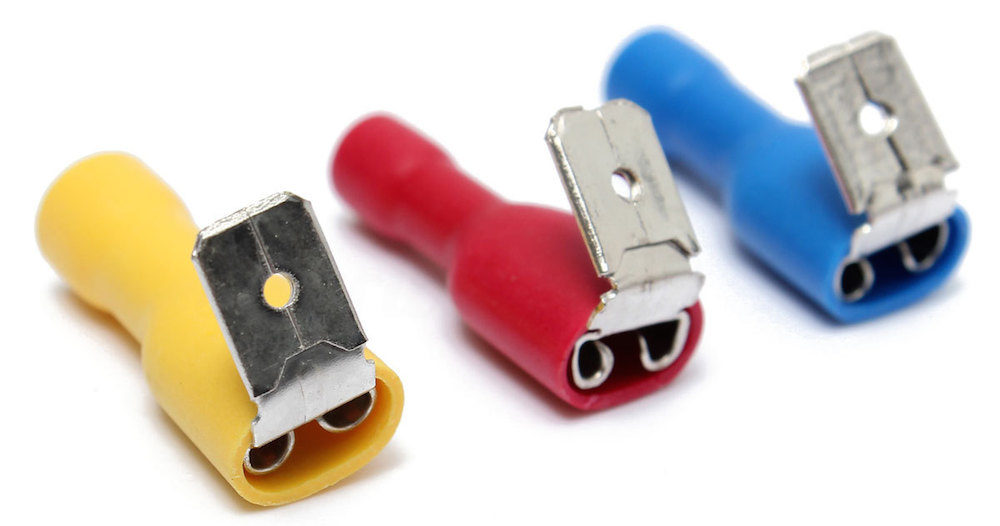
Piggyback Spade Connectors
One advantage to the Schmidt spade design is that you can use ‘piggyback’ spade connectors at the hub. These connectors have a second set of spades built in, allowing you to connect two extra wires (ie. your USB charger) to the system.
Wiring both lights and a charger simultaneously is not a problem provided there is an on/off switch on the light (or charger). This is because piggyback connectors will send power to both your light and USB charger. Unfortunately, there’s not enough power to run your lights at full brightness AND get a decent charge, so you can use the light ‘off’ switch to divert 100% of the power to the USB charger, or you can unplug devices from the USB charger with the lights ‘on’ for maximum illumination.
Splicing Cables
If you’re using the Shimano connector design, the best way to get power to both your lights and USB charger is by splicing the four cables together. This will produce a single set of cables with spade connectors at the end. Again, you’ll want to make sure that your dynamo front light (or USB charger) has an on/off switch because like piggyback connectors, spliced cables send power everywhere.
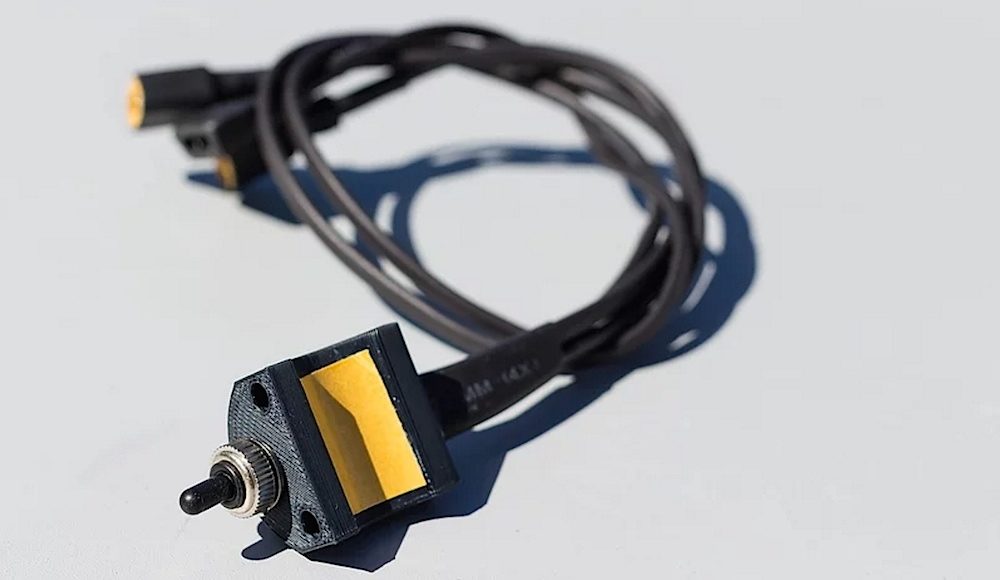
Dynamo Two-Way Switches
If your front light (or USB charger) does not have an on/off switch, you’ll want to incorporate a two-way switch elsewhere into your system. Two-way switches send 100% of the power from your hub to either your light or charger. Switches also allow the physical size of a dynamo light to be greatly reduced. Check out two-way switch products from Igaro and kLite.
Breaking Cables
There are a few ways to ‘break’ your cables. You may need to do this to extend the length of a dynamo cable, or perhaps it will help with removing components of your system when packing a bike into a box. I like to keep my system as modular as possible!
I use the ultra-neat Supernova Gold Connectors (US $16) in order to disconnect my rear light from my front. Alternatively, Schmidt makes some small and highly cost-effective 2.8mm spade connectors for a fraction of the price (US $0.20) which essentially do the same job.
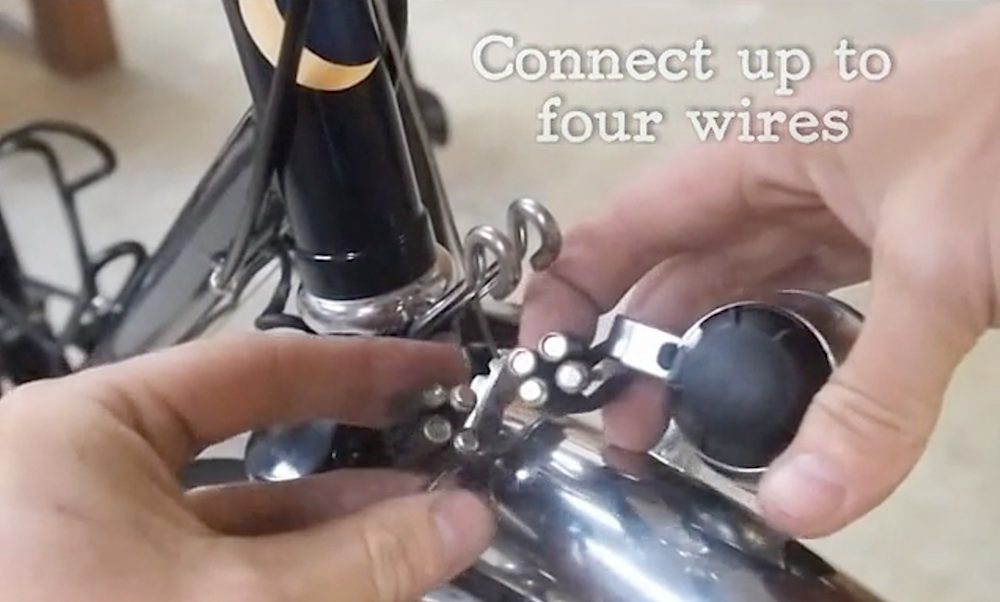
A more recent development are Dyna-Snap magnetic connectors. Using magnetic cable ends, you can disconnect parts of your dynamo system in an instant. An obvious advantage to this system is for easy front wheel removal. As there’s no delicate spade-locating required, the magnetic connectors can automatically find each other when in proximity.
Buffer Batteries
The power from a dynamo hub will drop too low for charging when your speed is below ~12km/h. GPS devices tend not to like this, displaying a rather annoying ‘lost external power’ message whenever you stop or slow down. Smartphones also don’t enjoy charging on a varying voltage, so to get the most out of your charging system you should plug a buffer battery into the USB charger, and your phone/GPS into the battery.
At higher speeds, the battery will store power which will be used to keep a constant power supply for your GPS/phone at the low speeds or when stopped. A buffer battery with power passing directly from input to the device has no loss in efficiency. But when the power is stored in the buffer battery rather than being used straight away, that’s where you will experience a loss of 15-20%.
There are a few things to note about getting a buffer battery. Some larger batteries (10000mAh+) will have a minimum current input of 1A, while most USB chargers will be delivering 0.5A for the majority of the time. This renders those batteries incompatible. You will also need to find a battery that can be discharged while it’s getting charged (‘pass-through’ charging). Lots of battery manufacturers will not permit ‘pass-through’ charging because it limits the lifespan of a battery. The best source for pass-through batteries is often through solar power kit manufacturers.
To learn everything about buffer batteries click through to my battery resource HERE.
Combined Light and Dynamo Units
There’s a few integrated dynamo lights/chargers which are cost-effective and elegant as they incorporate all of the electronics, including a switch, into the one simple unit. Keep in mind that they don’t include a buffer battery – you’ll have to add one to achieve a constant charge at low speeds for smartphones and GPS devices.
AXA Luxx70 Plus (70 lux) – USB charging, amazing value for money (US $139)
B&M Luxos U (70 lux) – USB charging, handlebar-mounted switch, great beam shape (Amazon Special US $178)
Sinewave Cycles Beacon (750lm) – USB charging, light assist with battery, very high output at low speed. (US $350)
To learn everything about dynamo lights and beam patterns, I recommend clicking HERE.
![]()
The Effectiveness of Dynamo Systems
At typical cycling speeds, you will not get a good USB charge and have a decent beam lighting the road – it’s one or the other.
Given the latest LED and lens technology, you can now buy dynamo lights that are over 100 lux or 1200 lumens at 20km/h (12mph). That’s more than enough for everything on the road, as well as most off-road stuff too. Some off-road dynamo lights can have power coming in via a battery for slow riding too (kLite Bikepacker Ultra, Sinewave Beacon).
You can achieve a decent charge at relatively low speeds with many of the USB chargers. This is enough to charge a phone or GPS in a few hours provided your speed doesn’t drop below 12-15km/h.
In terms of electrical resistance, you can expect to lose about 5 watts of pedalling power with your dynamo system on, and 0.25-1.00 watts when it’s off (when compared to a regular front hub). Click HERE to read all about dynamo hub efficiency and the effect on your riding speed.
Summary
Building a hub dynamo system takes a little bit of know-how, but it’s quite straight forward once you’ve got the basics.
I generally recommend starting with a dynamo hub, front light (with an on/off switch) and a USB charger. Either splice your cables together (Shimano design) or fit up piggyback spade connectors (Schmidt design) to get everything wired up neatly. Try to put a few cable ‘breaks’ in your system to keep it modular – especially if you’re planning on taking sections off your bike (fork, rack etc) for both flights and general bike mods.
Example high-performance system on a budget:
– Shimano UR705 disc dynamo hub (Amazon Special US $120)
– The Busch + Müller Eyc T 50lux light (Amazon Special US $74)
– The Kemo M172N USB charger (US $50)
– Optional: Cinq 5 Smart Power Pack II 3000mAh battery with variable 100/450/900mA current (€99)
Total: US $244
Example all-out system:
– Schmidt SON 28 dynamo hub (US $265)
– Schmidt Edelux II light (US $176)
– Cinq Plug5 Plus USB charger including buffer battery (€259/$289)
Total: US $730
There’s so much more to know about dynamo light beam patterns and USB chargers. Have a hunt around the site and you can find out much more information on it all.
Do you know about how marine wiring is done? Bike wiring has similar corrosion issues I would assume. There are adhesive lined crimp connectors and heat shrink tubing that seal the connections. You can also get tinned wire as well (but as the link below explains, it’s sealing the connections that is important). Here’s a link with a picture of a sealed crimp connector:
https://www.practical-sailor.com/issues/34_6/psadvisory/Tinned-Wire_5632-1.html
West Marine also has a marine wiring page. Amazon also has the crimp connectors and adhesive lined heat shrink.
So on the topic of USB charging with a dynamo hub I think some clarifications need to be made.
First of all, all I am about to say is based on my own experience with my personal bike and dynamo setup, I do not know for other setups.
I am running a Shutter Precision dynamo hub with a Supernova/tout-terrain the plug (I believe it is the model III). My smartphone is a BQ aquaris M5 and I have several powerbanks including the Anker one mentioned in this article.
The plug is hooked directly to the dynamo, for the moment I am not running any lights.
So, the basic output of a dynamo hub is 500mah and so is the output of the plug on the USB port. Most modern smartphones (meaning 5″+, full HD, 2GB ram…) require 1ah or more to be able to charge properly; which in practice, if I connect my telephone to the plug USB port it will NEVER CHARGE properly, actually even discharge faster. The same is true with the Anker power core, it cannot be charged with the plug, the output is too weak.
The only devices that I successfully managed to charge with the plug are a small usb powered bike light and a Goal Zero 3000mah power bank (they are used with solar panels). And for the powerbank I would charge half of it in a full day (~100kms) ride.
Of course it is possible that I am doing something wrong, but I think it’s important that I share my experience.
It’s interesting that you’re having these issues. You’re not running the SP 9 Series hub by any chance? That’s a 6V 1.5W hub model that isn’t intended for charging (it sounds like you have the 6V 3W model). The other thing is that the hub might not be producing the right output.
The smartphones that I’ve used don’t at all struggle with the 5V 500mA output, but they do charge MUCH slower than from the wall. Using a Schmidt SON28 hub and Plug III, my iPhone 5S is happy getting a trickle charge over 12km/h, as is my 6700mAh unbranded power bank.
The iPhone has a 1500mAh battery, so at a rate of 500mA per hour from my dynamo hub (cycling speed ~20km/h), plus a 20% loss in the charging circuitry, it takes about 3.6 hours to fill up. The battery is twice as big in your BQ Aquaris M5, so you can expect a 7 hour ride to fill the battery at 20km/h! Definitely not a fast enough charge if you’re a heavy phone user, and are cycling less than 100km per day.
I hope this helps!
Thanks for the answer,
I just checked and my dynamo is a Shutter Precision PD-8 6V3W.
So it sounds like I have the proper model.
Just returned from a 4 day cycle tour with our two girls (8 and 10 yo) – which means an average speed of 10-15km/h and max. 3 hours of cycling per day: haven’t had any issues while perfectly loading 2 iPhone SE, Sony A6500 and several black diamond headlamps. The only thing I have had to care about: changing the plug when the batteries where fully charged.
Setup: Schmidts Original Namendynamo SON 28, Thomas Dreiers Dynamo Harvester plus
Dynamo Harvester ??? see the webpage: https://www.be-on-bike.de
For detailed information you should also read the fulminant article series by A. Oehler in “Fahrradzukunft” (http://fahrradzukunft.de) and especially part 5 (http://fahrradzukunft.de/22/steckdose-unterwegs-5/)