

This is a little project I set for myself that I’m hoping can be a guide for your own custom build or bike upgrades. It’s essentially a list of all of the gear that I think is well-proven for bike travel. The project will also give you a good idea for the types of setup and parts I’m always thinking about.
This can be considered a ‘dream build’, but I’ve importantly factored in:
Price – I’ve selected parts that offer high comfort, performance and durability without necessarily being the most expensive.
Product availability – You won’t find particularly obscure or custom parts here; most parts are available in all regions.
This build is designed to handle the world’s roughest roads and will support a massive amount of gear if you need. It’ll crush famous routes like the Pamir Highway, Peru Divide or Outback in Australia, but will also roll fast enough to cover the bike paths of Europe. I think it’s a great all-rounder for a round-the-world trip!
Let’s dive into what parts I’ve selected and why, and let me know how you’d spec your own ‘realistic dream build’ in the comments.
Round-The-World Touring Frameset – $722
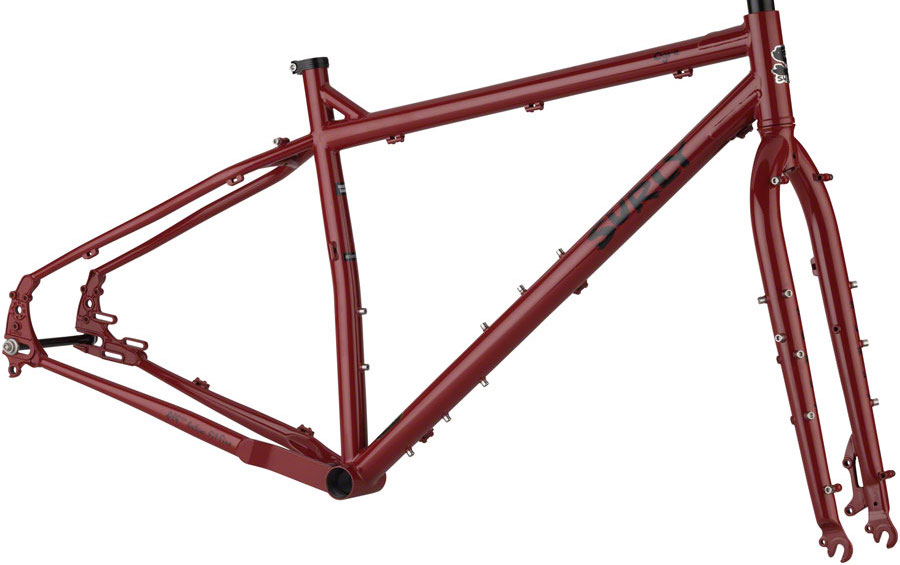
Frameset: Surly Orge – $679
The Surly Ogre frameset isn’t perfect, but I think it offers so, so much for the price. It has primarily been selected because it can run wide 29 x 2.20″ tyres with full fenders. Without fenders it’ll squeeze in a 2.50″ knobby tyres, or even 3.00″ with a 27.5 rim. That gives you a huge range of terrain options from bike paths through to gnarly singletrack. The Ogre frame sizing has been optimised for alt handlebars (or risers), which I’ve found to offer the best bike handling under almost all conditions. You can dress the Ogre up with whatever kind of luggage you prefer – there’s a heap of cargo cage mounts, front rando rack eyelets or standard pannier bolt holes. If you feel like adding an internal gearbox later, the Ogre is Rohloff hub compatible with its horizontal dropouts and axle plate slot. For a drop-bar build (more on my handlebar choice below), I’d probably pick the Salsa Fargo frameset instead – the added benefit of going down this route is that the Fargo is also belt drive compatible.
Headset: Cane Creek Forty – $43 on Amazon
This is easily the best headset under $50. It offers excellent bearings and extensive seals to keep water and debris from affecting the performance of the headset.
Wheelset – $715

Front Hub: Shutter Precision PD-8 Dynamo Hub – $130
The SP dynamo hubs offer decent reliability at half the cost of a Schmidt SON. They also run practically as efficiently, in fact, they’re more efficient at 10km/h. Read more about dynamo hubs HERE.
Rims, Spokes, Rear Hub: Velocity Cliffhanger – $575 with SP-Dynamo hub
This wheelset is a super solid option that is pretty easy to come by. It offers a super-stiff touring rim, a 25mm internal width (suitable for tyres up to ~2.60″), Sapim Leader spokes and tubeless compatibility with the Velocity rim strips. The $100 upgrade will get an SP dynamo hub built into the front wheel. Read more about touring rims HERE.
Tyres: Schwalbe Almotion Snakeskin 29 x 2.15″ – $140/pair on Amazon
I’ve been blown away by the capability of the Almotion tyre. It’s the fastest touring tyre on the tarmac (even in the 2.00-2.15″ range) and it’s tough enough for the roughest dirt roads. The wide widths offer extra comfort and I’ve found them to be super puncture resistant too. I get 15,000km+ out of a set provided I switch the rear tyre to the front at about 10,000km. I’d probably go the Vittoria Mezcal 29 x 2.35″ for extra grip off-road, or if the rim/tyre combo worked out, the 29 x 2.60″ version. Read more about Schwalbe touring tyres HERE or durable bikepacking tires HERE.
Drivetrain – $398
![]()
Crankset & BB: Shimano Deore M6000 40/30/22t – $100 and $25 on Amazon
I have selected a 10-speed triple chainring setup for this build, which obviously goes against the current trend for 1x.
There are a few reasons for this:
1. Wider gear range (17-104″). This achieves a climbing gear that allows a good cadence at 5km/h (3mph) for the steep hills, but also a top gear that will have you still pedalling at 45km/h (28mph).
2. Smaller gaps between gears. This triple drivetrain offers a 595% gear range. A 1x can offer 500%, but with the wide cassette, you’ll have a bigger jump between each gear. This is fine in the mountains but can be frustrating on the flat.
3. Reduced drivetrain wear. It’s easier to get a straighter chain line with a 3x setup because you’ll use the smallest chainring with the biggest rear cogs and the biggest chainring with the smallest rear cogs. This allows for a higher drivetrain efficiency (see the test HERE) as well as a longer service life.
Cassette & Chain: Shimano Deore M6000 11-36t & Shimano HG54 – $36 and $21 on Amazon
These drivetrain parts are not particularly expensive and are pretty easy to find around the world. 10-speed is now featured on many mountain bikes under $1000.
Front Derailleur: Shimano XT M781 Direct Mount + Problem Solvers Direct Mount Adapter – $33 on Amazon
The XT derailleur offers high-end performance at a very reasonable price. The Surly Ogre is routed specifically with a high direct mount top-pull front derailleur in mind, which requires a PS clamp adapter (HERE).
Rear Derailleur: Shimano XT M781 – $81 on Amazon
This XT derailleur is pretty bombproof with nice and crisp shifts. The ‘shadow’ design sits the derailleur very in-board which gives them excellent clearance around rocks.
Pedals: Shimano XT T8000 – $102 on Amazon
I have nothing but good things to say about Shimano XT pedals. I’ve worn through two sets, each clocking an outstanding 50,000km (they still worked fine after a re-grease, but felt a little sloppy). The T8000 is clip-in on one side, but flat on the other. It’s weighted to prioritise clipping in, so I never have to find the ‘right’ side. If you’d like a dual entry, check out the M8020 trail pedals.
Cockpit – $370
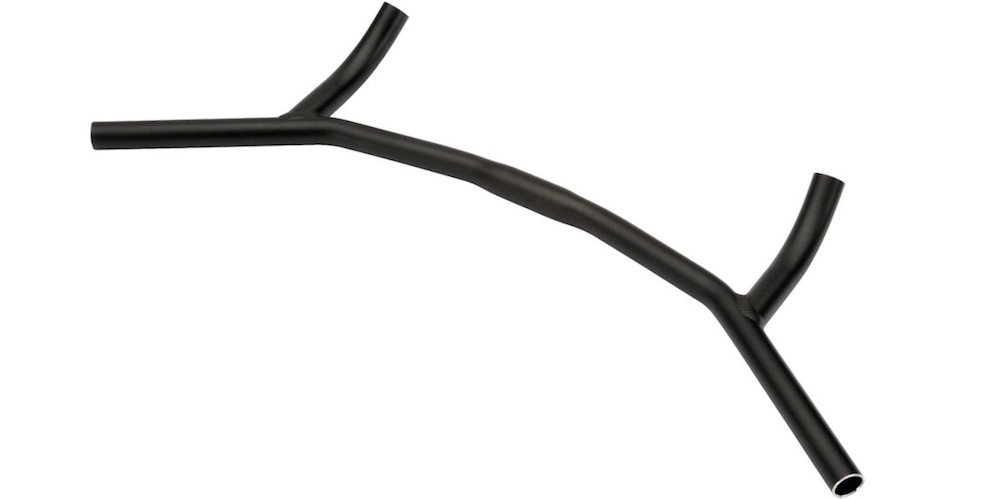
Handlebars: KOGA Denham Bars – $78 (HERE or HERE)
I designed the KOGA Denham Bars, so they’re obviously the ultimate for touring! My bars have a bullhorn section which lets you mimic the ‘hoods’ of a drop handlebar (making your body more aerodynamic) and they also feature a wide grip section for the best bike control with front luggage. The Surly Moloko bars share many traits with my signature handlebar, so they’d have to be a close second. You can read about the thinking that went into the Denham Bar design HERE.
Stem: Generic 4-bolt black – $16 on Amazon
I don’t find a big difference between stems once you get to a certain value. Anything 4-bolt with nice hardware is good enough for me. If you’re riding rough roads and want a little extra comfort, take a look at the Redshift ShockStop suspension stem.
Brake Levers and Calipers: Shimano Deore and TRP Spyke – $32 and $149 on Amazon
Cable disc brakes offer the best value for money, plus they’re the easiest to work on. The TRP Spyke calipers are the pick of the bunch because they pull both brake pads in like a hydraulic caliper. I’ve paired these calipers with Shimano Deore levers. You can read more about touring brakes HERE.
Shifters: Shimano Deore M6000 3x/10-speed – $36 (R) and $30 on Amazon
I really like the simplicity of thumb shifters, but unfortunately, they do not pair well with the bullhorn section of the KOGA Denham bars. Instead, I’ve specced the latest Shimano Deore 10s trigger shifters on this build.
Grips: Ergon GC1 – $29 on Amazon
This grip is developed specifically for backwards-swept handlebars like the KOGA Denham Bars. The grip surface is designed to spread your upper body weight over a larger surface area, minimising hand numbness on long rides – and it really works! There’s also a raised bulge in the middle of the grips that cups nicely below your hand. These grips are quite long, so I normally lop 10-20mm off each side so that there is more real estate at the base of my bullhorns. Read more about grips HERE.
Saddle and Post – $292
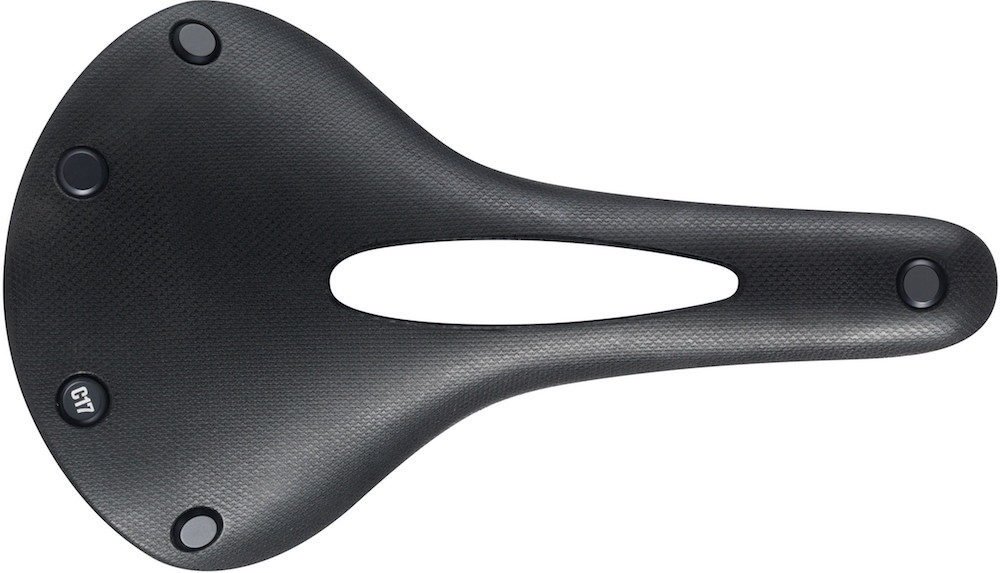
Saddle: Brooks Cambium C17 All-Weather – $93 on Amazon
While saddles are hugely personal preference, Brooks saddles are renowned for a reason. The Cambium series saddles may not be made from leather, but this allows them to be waterproof and longer-lasting without a ‘break-in’ period. The C-series have been matched in terms of shape to the most popular touring saddle (ever?), the Brooks B17. They come in three different widths, with and without cutouts – the latter providing a bit more saddle flex. Read more about saddles HERE.
Seatpost: Cannondale SAVE – $199 on Amazon
In terms of rider comfort, a flex seatpost is the ultimate upgrade. Bike frames require upwards of 500N of force to flex one vertical millimetre, translating to barely a millimetre of travel when you apply your body weight to a frame. On the other hand, a carbon seatpost like the Cannondale SAVE requires well under 100N of force to travel the same distance, translating to more than 5mm of vertical flex when you’re simply sitting on the saddle. This allows a great reduction in road buzz, and with 20mm of total flex, the seatpost will absorb big hits on any dirt roads. Read all the nitty-gritty on seatposts HERE.
Accessories – $420

Lights: AXA Luxx 70 Plus and Busch und Muller Line Plus // $71 and $33
The AXA Luxx 70 may not be the brightest light or the best USB charger, but at well under $100 it definitely represents the best value-for-money. The asymmetric lens is optimised for bike paths and roads so your light won’t blind people approaching you. With the light off, you’ll be able to top up your smartphone from around 12km/h. Read more about dynamo lights HERE.
Racks: Tubus Logo Classic 29 and Tubus Duo – $104 and $119 on Amazon
Along with rims and spokes, racks are the next likely thing to break on a round-the-world touring bike. If you’re planning a long journey, I think getting high-end racks is one of the best ways you can spend your money. I’ve had the most success with Tubus (zero failures) – but if you break these racks anywhere in the world within five years, they send some new racks out, no questions asked! Read more about racks HERE.
Fenders: SKS Bluemels 75 U – $75 on Amazon
These wide fenders will clear a 2.60″ tyre with certainty, but will likely fit a 27.5+ tyre too. They come with quick-release mounts to prevent sticks and rocks from getting caught on trails. For the best fit, I’d recommend using these guards with a Problem Solvers Fender Flute. Read more about fenders HERE.
Kickstand: Pletcher ESGE Comp – $18 on Amazon
I’m a massive kickstand fan. Craig, a Surly and kickstand fan, designed two 3D printed stainless steel parts (part 1 + part 2) that will mount a KSA-18 kickstand onto Surly Troll, Ogre or ECR dropouts. Read more about kickstands HERE.

Build Summary
The total came to US $2917 for this ‘realistic dream build’.
Make no mistake – a complete touring bike offers unparalleled value. But if you’re interested in optimising the parts, it can really be worth building a custom bike to get the right gear ratios, brakes, rims, tyres and more.
Although this is a lot of money, I think it still represents good value considering the comfort, durability and performance that this build would offer. I was pretty careful about saving money in areas where it’s safe to do so, but in other areas, I picked parts which would optimise everything nicely.
You can definitely cut corners at the saddle, seatpost and tyres, saving ~$300 off the build price. You could also do without the lights, dynamo hub, fenders, kickstand and racks (if you went for bikepacking bags instead) bringing the build price down to a touch over US $2000.
And if you were to use the same parts but with a Rohloff 14-speed internally geared hub, I’ve estimated that the total price would increase to about US $3935.
How Would You Spec Up A Dream Build With Price Factored In?


