

Carbon belt drive has been developed over the past 30 years into a high-performance power transmission system. It is used not only in cycling, but also in applications such as driving blowers in 10,000-horsepower racing engines, powering 150-horsepower motorcycles, and more recently, in bicycle drivetrains.
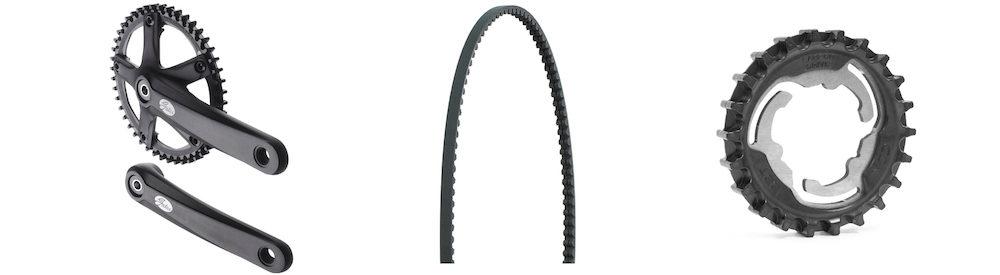
The belts consist of a continuous loop of polymer with moulded nylon teeth, reinforced by multiple carbon fibre tensile cords. These are paired with stainless steel rear cogs and durable alloy front chainrings, creating a robust drivetrain alternative capable of operating in temperatures ranging from -65°F (-53°C) to +185°F (+85°C).
Belt drive systems are valued for their low maintenance requirements and typically offer 3-4× the service life of a traditional chain. However, their adoption is limited by the fact that belts cannot be used with derailleur systems. Instead, they rely on internally geared hubs such as Rohloff or Shimano hubs, or gearboxes like the Pinion P1.18.
I’ve personally been using belt drivetrains paired with Rohloff 14-speed hubs since 2010. That includes a 31,000 km (19,000 mi) ride from Europe to Australia, a current 45,000 km journey from Argentina to Alaska, and numerous multi-month tours in between. My experience began with a modified Surly Bikes touring bike, later moved to a custom Co-Motion tandem, and now continues on a KOGA WorldTraveller-S touring bike.
Note: This article was originally published in May 2012 but has been completely overhauled Feb 2019.
Why Use Belt Drive?
Belts have a long service life
A properly maintained belt drivetrain can last well beyond 30,000 km (19,000 mi). Unlike chains, belts do not rust, even with frequent exposure to rain or salt, making them particularly well-suited to coastal or all-weather riding.
Belts require little to no maintenance
There’s no need for lubrication or degreasing. Maintenance is typically limited to occasional cleaning with water and a brush to remove dirt or grit buildup.
Belt drivetrains are silent
A well-tuned chain is quiet when freshly cleaned and lubricated, but a belt is typically that quiet all the time. In most conditions, the drivetrain produces little more than a faint hum, with only occasional need for silicone treatment.
Belts are marginally lighter than chains
In many setups, belt systems can save around 100 grams compared to a chain drivetrain. See my drivetrain weight comparison HERE.
Are There Any Downsides?
You need a belt-compatible frame
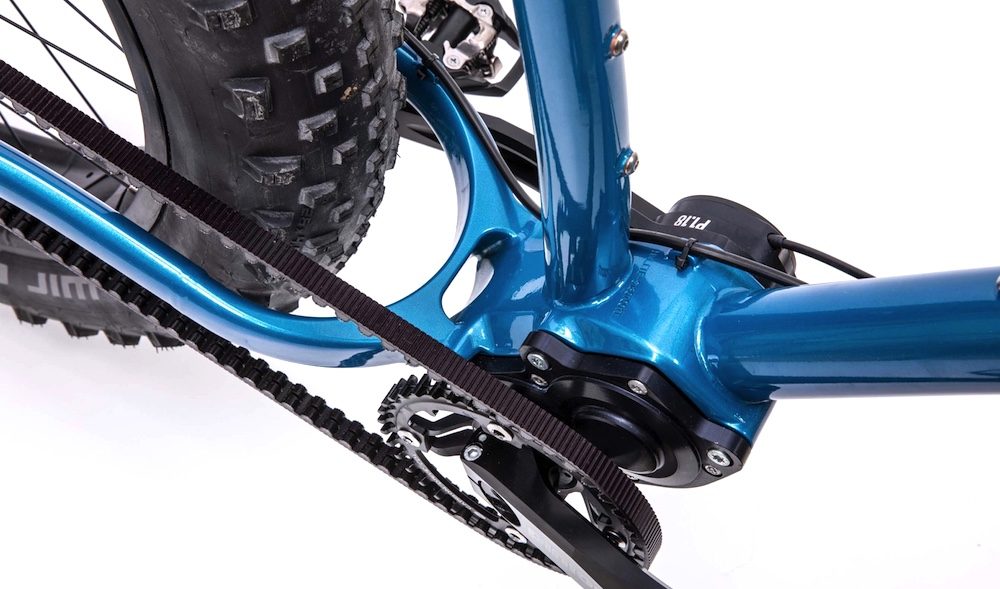
Because belts are a single continuous loop, the frame must include a split in the rear triangle to allow installation. It also needs to be designed with sufficient stiffness and proper alignment so the belt stays securely on the rear sprocket. A stiffer rear triangle can even allow for lower belt preload, which reduces drivetrain resistance.
Belts are less efficient than chains at low power outputs
At lower rider inputs, belts tend to show slightly higher friction than chain drivetrains. However, this gap narrows quickly with increasing power, and in dirty or muddy conditions, belts may actually have an advantage because they shed grit far more effectively than a chain’s many moving links.
Replacement parts are not commonly stocked in shops
Belt components are less widely available in local bike stores. That said, given their long service life, replacements are rarely needed. For long tours, carrying a spare belt (around 87 grams) is a sensible precaution; it packs small and can be a trip-saver. In contrast, chainrings and cogs are rarely carried as spares due to their durability.
Higher upfront cost
Belt systems cost more initially than traditional chains. However, over their lifespan, the cost per kilometre can be very competitive. For example, over full use, belt drivetrains can work out to roughly 125 km per dollar. This is comparable to a chain system costing around $60 per 7,500 km (a typical upper lifespan for a high-performance chain).
Gates Belt Drive Models
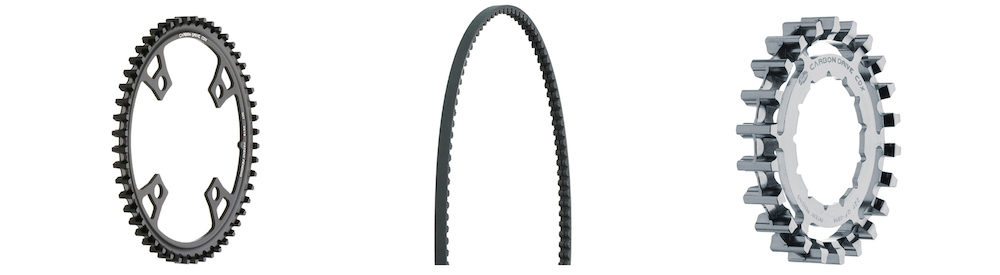
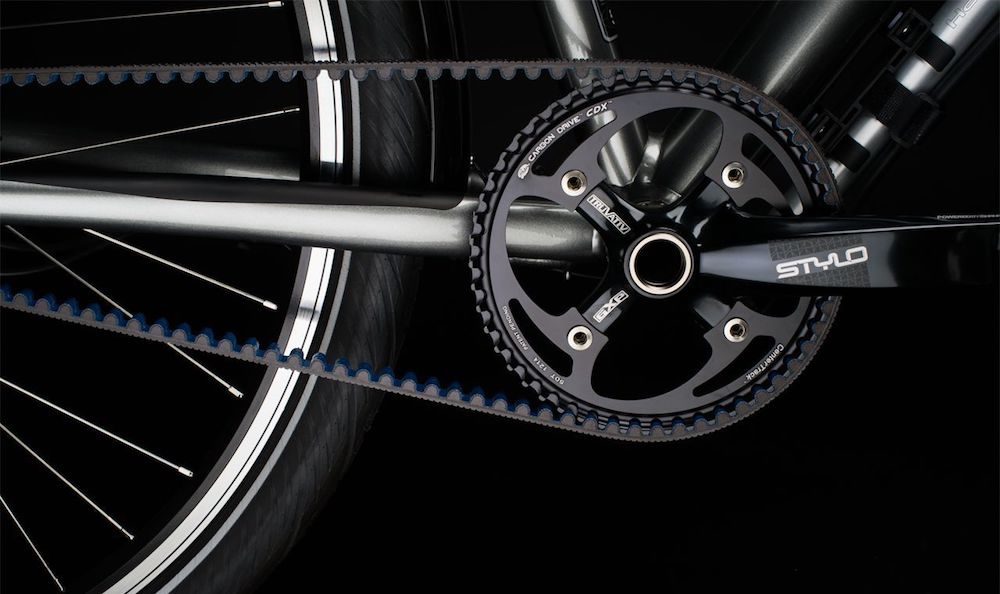
CDX: High-Performance
The CDX High-Performance system is the most widely used belt drivetrain. It is commonly found on touring, trekking, and adventure bikes. The system offers a broad range of gearing options, including 16 belt lengths, 7 front sprocket sizes, and 8 rear cog sizes, giving riders a high degree of drivetrain flexibility.
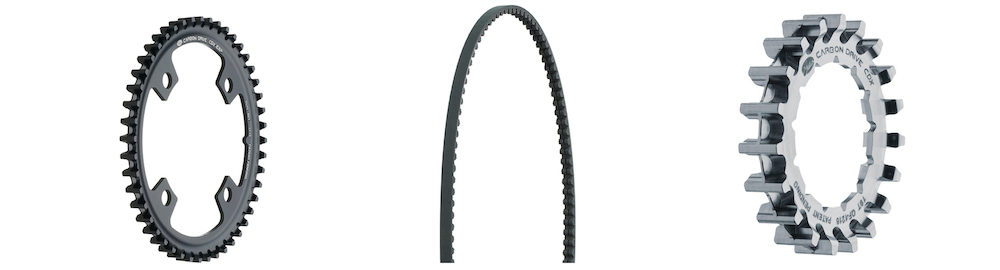
CDX: EXP
CDX EXP is a newer, oversized version of the CDX system, featuring around 25% more contact surface area. It is designed to improve both durability and range, though it is still relatively uncommon on production touring bikes. The current range includes five front sprockets and four rear cogs.
CDN: Urban
CDN Urban is the entry-level belt system from Gates, designed to bring belt drive technology to city bikes in the €500 complete bike segment. It is intended for casual use and is not approved for mountain biking, mid-drive e-bikes, fixed-gear applications, or high-mileage touring.
There have been some reported issues with early CDN rear cogs, although many of these have since been replaced or upgraded to compatible stainless-steel CDX components for improved durability and reliability.
Rear Triangle Stiffness & Belt Drive Frames
One of the most critical requirements for a belt drivetrain is a sufficiently stiff rear triangle, especially on loaded touring or bikepacking setups.
On earlier belt-equipped touring bikes, frame flex was sometimes enough to introduce belt misalignment under high load, occasionally causing the belt to skip. However, on a more rigid frame like the KOGA WorldTraveller-S, even high pedalling torque with luggage has not produced any belt skipping, indicating a significantly improved level of stiffness.
A stiffer rear triangle also has an efficiency benefit. Because belt systems rely on higher baseline span tension than chains, a rigid frame allows the system to operate safely at lower preload tension. This helps minimise drivetrain resistance while maintaining reliable engagement.
Gates provides a “stiffness test approved” label for frames that meet its minimum requirements. However, this is only a baseline standard. In practice, some touring and trekking manufacturers exceed this threshold by a wide margin. Frames that use oversized chainstay and seatstay tubing generally perform best in this regard (I have an article on frame stiffness HERE).
Belt Drive Frames: Belt Tensioners
A belt drivetrain requires a method for setting and maintaining correct belt tension. There are three main frame design approaches, each with distinct advantages and trade-offs.
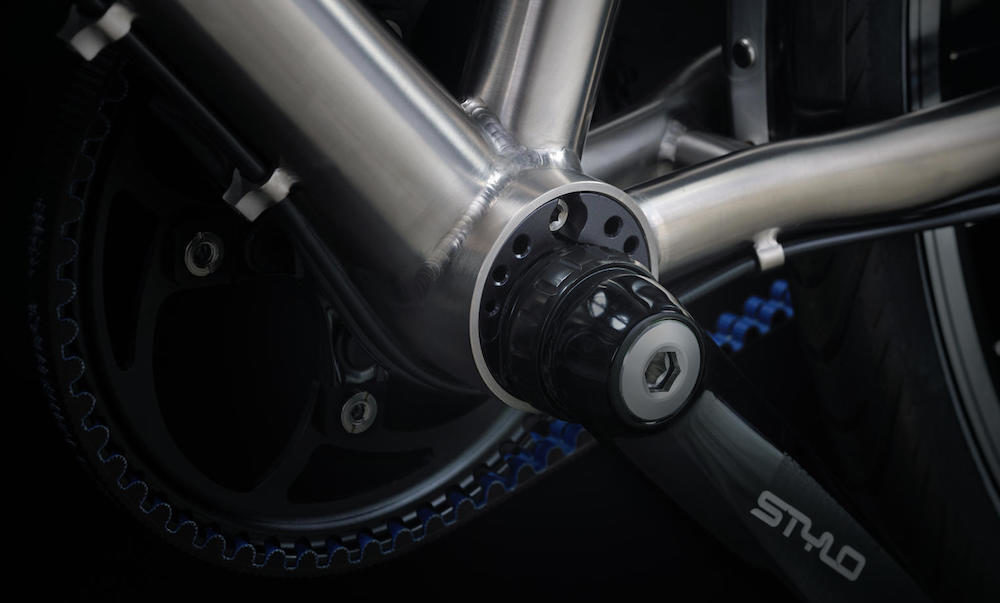
Eccentric Bottom Brackets (EBB)
Eccentric bottom brackets allow the crankset position to be adjusted—typically around 13 mm forward or backward—to fine-tune belt tension. They also offer the flexibility to run a slightly higher or lower bottom bracket height depending on terrain preference.
In practice, EBB systems can sometimes develop creaks on long rides and may require more maintenance. They can also be susceptible to water ingress, which can make adjustments more difficult in the field.
On the positive side, manufacturers such as KOGA have demonstrated that well-designed EBB frames can achieve very high rear triangle stiffness, which is beneficial for belt performance and efficiency.
Sliding Dropouts
Sliding dropout systems provide around 20 mm of adjustment and are generally very user-friendly. One of their key advantages is convenience: when removing the wheel, the belt can drop out and be reinstalled without needing to reset tension each time.
However, lower-quality implementations can sometimes allow the axle to shift forward under load, which can lead to insufficient belt tension if not properly designed or tightened.
Horizontal Dropouts
Horizontal dropout designs are less common for belt drive systems and are generally not recommended by Gates. This is because belt tension must be carefully reset each time the wheel is removed, which adds inconvenience and increases the chance of setup error.
If used, there must typically be at least 10 mm of adjustment remaining in the dropout slot after installation. This clearance is necessary to allow the belt to be fitted onto the chainring during wheel installation without excessive force or misalignment.
Belt Drive Frames: Splitters
Unlike a chain, a belt is a single continuous loop, so the frame must include a split in the rear triangle to allow installation. This “splitter” can be integrated into the seatstay, chainstay, or, more commonly, the dropout area.
The most widespread solution is a split built into the rear dropout system. However, some manufacturers have experimented with seatstay splitters in an effort to maximise rear triangle stiffness and maintain structural integrity under load.
In the past, some riders modified existing frames by adding splitters to convert them for belt use. This approach is generally no longer recommended, as it is difficult to guarantee sufficient rear triangle stiffness and long-term alignment accuracy once a frame has been altered.
Today, purpose-built belt frames are widely available at prices comparable to the cost of modifying and repainting a frame. As a result, dedicated designs are typically the safer and more reliable option.
If a modification is still being considered, it should only be carried out by an experienced and reputable frame builder with proven expertise in belt-compatible frame construction.
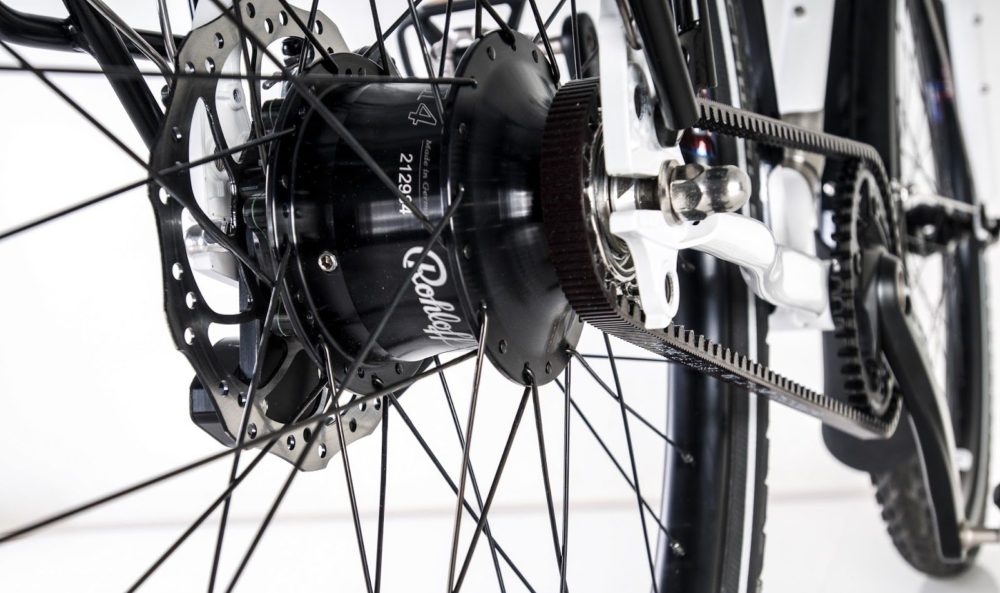
Belt Drive and Rohloff Hubs
Belt drive combined with a Rohloff hub is widely regarded as a highly durable and low-maintenance touring setup, but there are a few important requirements to ensure proper function and maintain warranty coverage.
First, the frame must meet a minimum rear triangle stiffness standard. Manufacturers typically verify this using a dedicated testing jig to achieve “stiffness test approved” status. A list of approved frames is available from Rohloff and partner manufacturers.
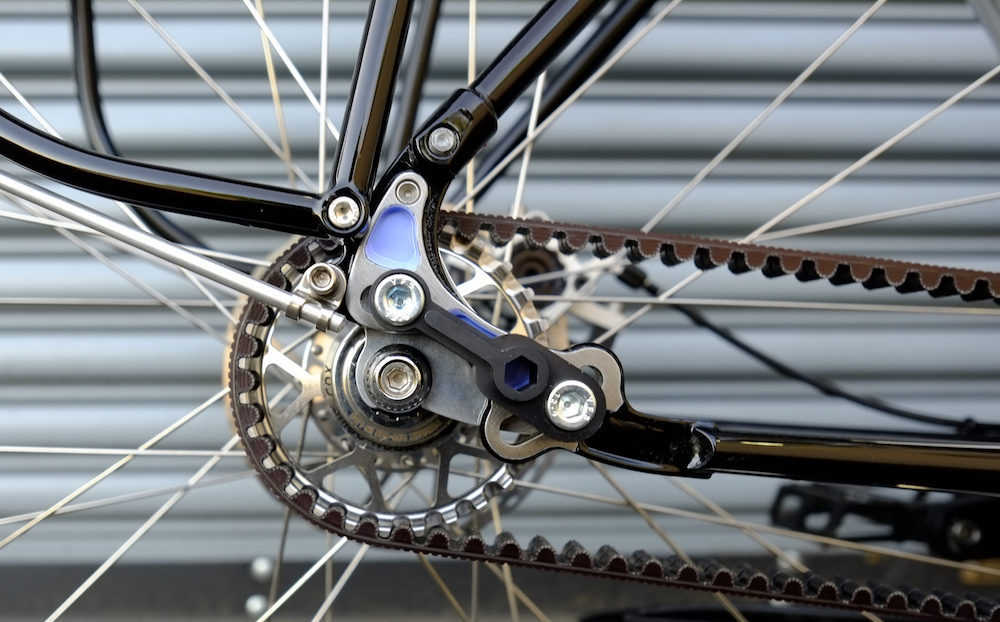
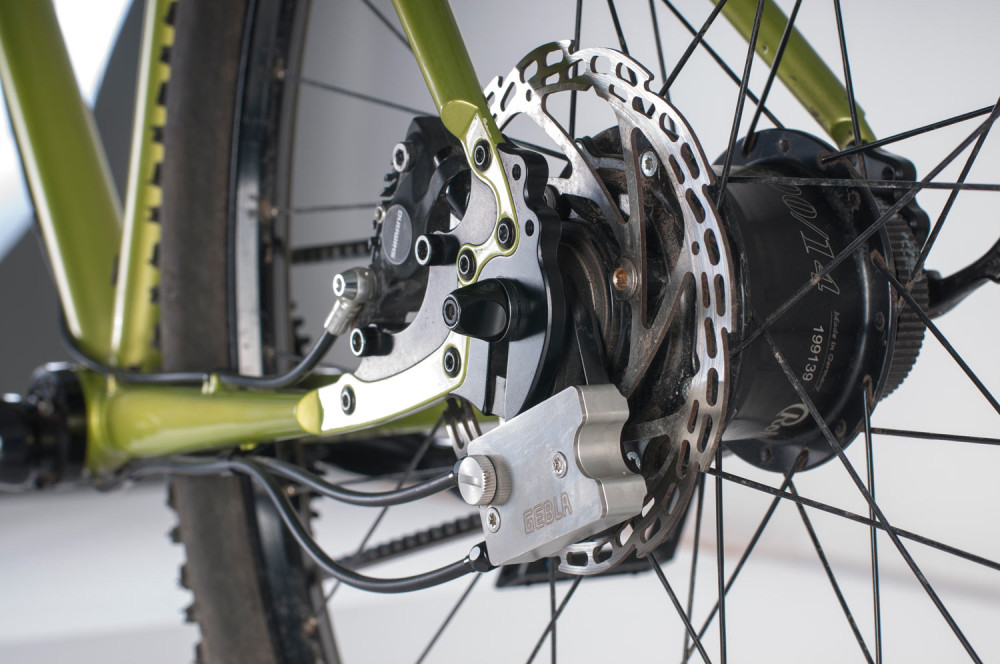
Second, the use of a belt snubber is strongly recommended. This component helps prevent the belt from riding up and off the rear sprocket under high load or when the belt tension is slightly low. If this happens, it can place stress on the belt’s internal carbon tensile cords, so a snubber adds an important layer of protection.
In earlier systems, belt sprockets were threaded directly onto Rohloff hubs. This has since been replaced with a more user-friendly splined carrier system (part #8540L), which supports interchangeable belt cogs in common sizes such as 19T, 20T, and 22T. This update significantly improves ease of maintenance and gear ratio changes.
There was a known issue with the first-generation splined carriers, but it was resolved in mid-2018, with updated components and warranty replacements issued. This is no longer considered a concern in current systems.
Belt Lines and Frame Clearance
A straight and precise belt line is essential for reliable belt drivetrain performance. Ideally, alignment should be within approximately ±1 mm. Because the rear cog position is usually fixed by the hub system, most adjustment is done at the crankset or chainring position.
Typical belt line values for common systems include:
- Shimano Alfine Di2: 39.8 mm
- Alfine 8 / 11: 43.7 mm
- Nexus 8: 44.35 mm
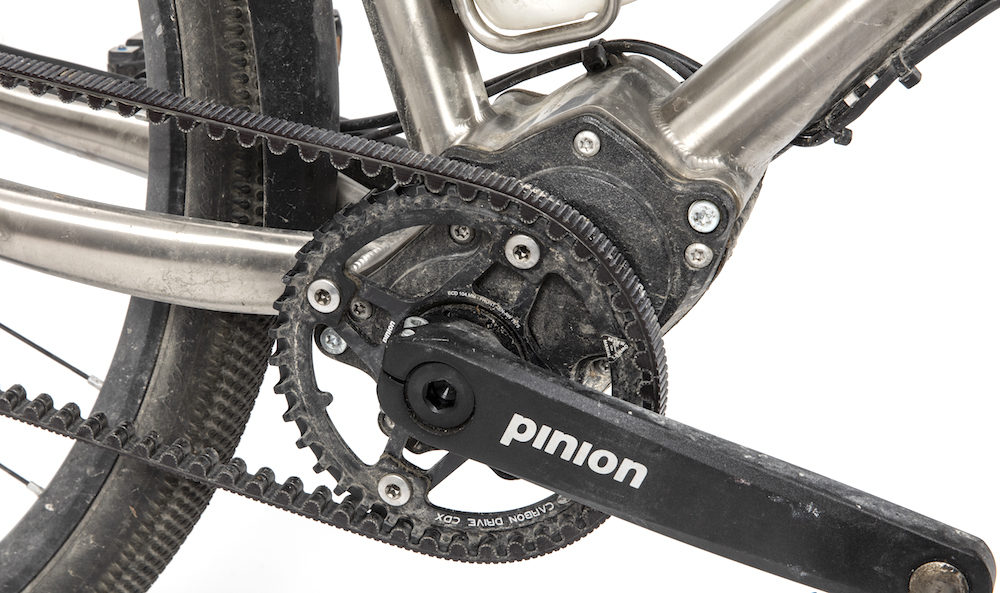
- Nexus 7: 43.05 mm
- Pinion C-Line: 52 mm
- Rohloff 148 mm (splined carrier): 51.7 mm
- Rohloff 135 / 142 mm (splined carrier): 54.7 mm
- Pinion P-Line: 56 mm
- Rohloff 170 / 177 / 190 / 197 mm: 72.2 mm
To achieve correct alignment, it’s important to check the chainline specification of the crankset you plan to use. For example, a triple 104 BCD crankset typically has a chainline of around 55 mm when the chainring is mounted in the outer position, which makes it a common choice for Rohloff-based belt setups.
Gates also produces cranksets with multiple belt line options (such as 39.8 mm, 43.7 mm, 45.5 mm, and 54.7 mm) to better match different hub systems and frame geometries.
Another important consideration is chainstay clearance, particularly when using Shimano hub systems. Because the gear selector mechanism is external on the drive side, it can create tight clearance constraints. If a frame does not provide sufficient space between the chainring and chainstay, compatibility issues may arise. In these cases, it is advisable to confirm clearance with the frame manufacturer before committing to a build.
Gear Ratios
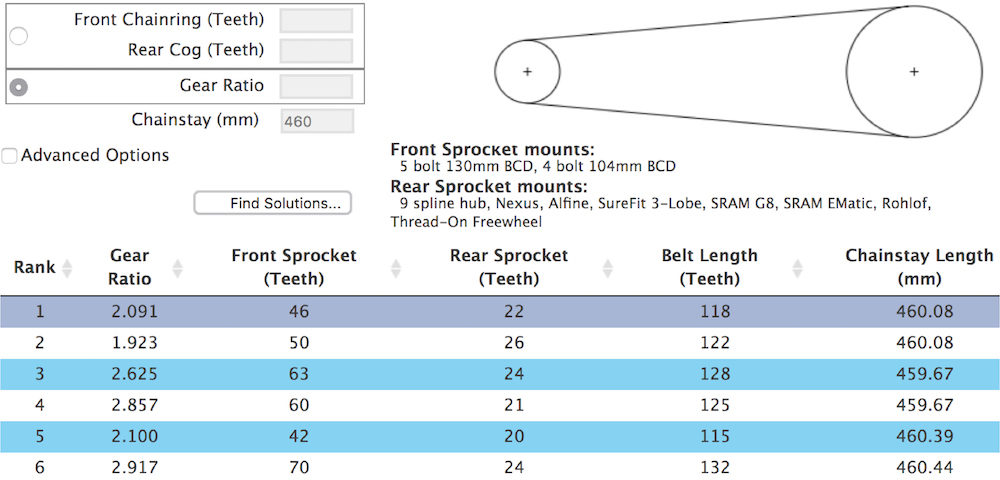
You might assume that fixed belt lengths would significantly limit gearing options, but in practice, the system is quite flexible. With multiple belt lengths available, along with a range of compatible chainring and rear cog sizes, the resulting gaps between usable gear ratios are relatively small.
The Gates Calculator (also available as a smartphone app) is a useful tool for selecting compatible combinations. By entering your frame’s effective chainstay length (for example, 460 mm) and selecting “Find Solutions”, it will generate all viable belt, chainring, and cog pairings that fit your frame geometry first. From there, you can refine the options based on your preferred gear ratio and intended terrain, in line with the available components for systems such as Rohloff, Shimano, or Pinion.
As noted earlier, if you are using a belt drivetrain with horizontal dropouts, there must be at least 10 mm of adjustment remaining in the dropout slot once the belt is installed and tensioned.
Belt Drive and Tandems
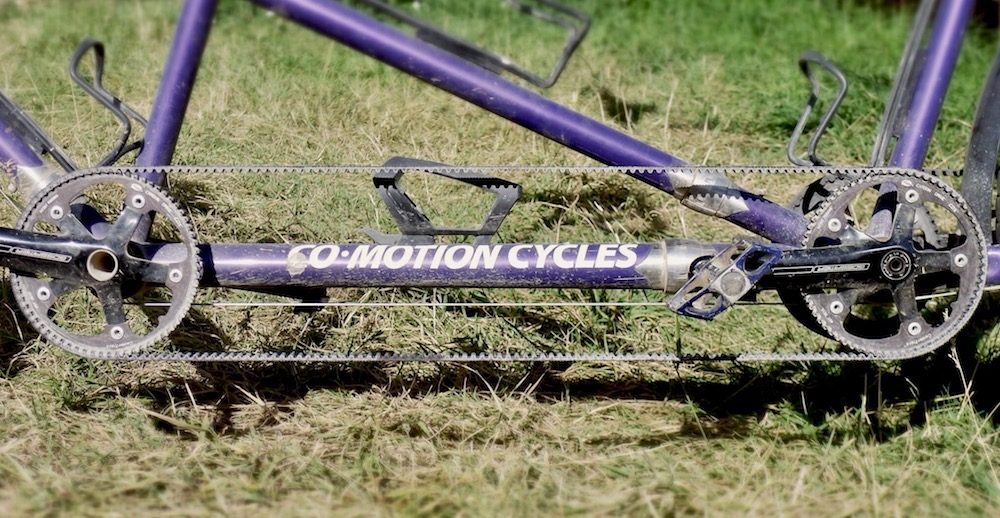
Gates belt drives can also be used on tandem bicycles, primarily as a timing belt system between the front and rear cranks. This setup typically offers a small weight saving of around 250 grams compared to an equivalent chain and chainring arrangement.
For proper function, tandem frame geometry is important. The boom tube must be designed to accommodate a precise bottom bracket spacing, typically around 724 mm between the two bottom brackets. In addition, compatible cranksets with a 130 BCD standard are generally required to ensure correct belt alignment and fit.
It is technically possible to run belt drives on both the timing (non-drive) side and the main drivetrain (drive side) of a tandem. However, in most practical setups, using a belt only for timing is the preferred and more common configuration due to simplicity and compatibility considerations.
Maintenance and Cleaning
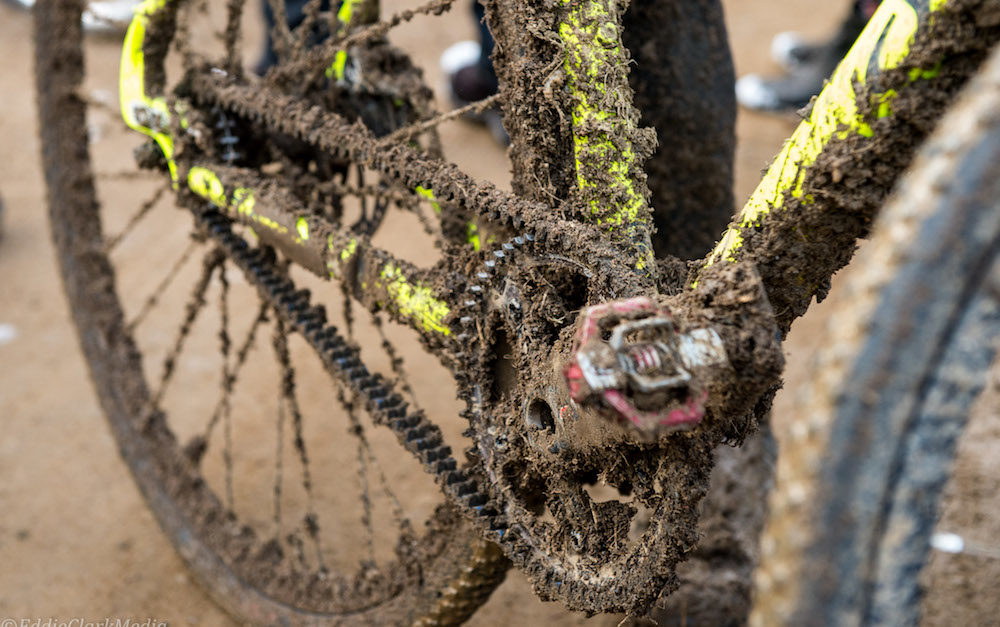
Gates belt drivetrains are often described as nearly maintenance-free. In most cases, cleaning is straightforward: a rinse with water and a quick brush—such as an old toothbrush—is usually sufficient. There is no need for degreaser, chain cleaners, or handling oily components.
Actual maintenance needs depend heavily on riding conditions. In very dry and dusty environments, a light application of silicone lubricant may be required every few days. In contrast, in cleaner or wetter conditions, it can often be months between any meaningful maintenance. While belt systems generally shed mud and grit effectively, keeping the tooth profiles clean helps maintain optimal efficiency and lifespan.
When lubrication is needed, a general-purpose silicone spray is typically used at the first sign of squeaking. These products are widely available, including automotive-grade sprays found in many parts of the world. Gates also recommends specific heavy-duty silicone lubricants designed for belt drive applications.
Handling Belts

Gates belts require careful handling to avoid damaging the internal carbon fibre tensile cords. Excessive twisting, sharp bending, or compressive force can compromise the structure, so the key principle is to avoid stressing the belt in any unnatural direction. For long-term storage, it is best to keep the belt fully relaxed and uncoiled.
When installing a rear wheel, the belt should not be forced or “cranked” into place as you might with a chain. Instead, it should be positioned onto the front chainring and rear cog first, and then the wheel is inserted into the dropouts while maintaining alignment.

One advantage of belt systems is portability. They coil compactly and are easy to carry as a spare on long trips. A spare belt can typically be stored in a pannier pocket without issue. However, care is still required when folding and unfolding it. Sharp bends should be avoided, and the belt should be allowed to form a natural coil. When correctly packed, it will typically settle into a smooth loop that folds into roughly three relaxed sections.
Tensioning Belts

Gates Carbon Drive belt tension varies depending on the drivetrain setup (singlespeed or internally geared hub) as well as rider power output. Achieving the correct tension is important, and there are several methods to measure it.
Smartphone app method
A simple smartphone app can be used to estimate belt tension by measuring vibration frequency. You hold the phone near the belt, pluck it lightly, and the app calculates an average frequency based on the sound.
Dedicated tension tools
More precise tools, such as a Sonic Tension Meter or Krikit gauge, are available from specialist bike shops. While these offer higher accuracy, many users find they are not strictly necessary for routine setup and maintenance.
Checking for variation (tight spots)
Belt tension can vary slightly as the crank rotates. For this reason, multiple measurements should be taken at different crank positions, with the results averaged. A variation of around 10 lb or 15 Hz is generally considered acceptable. If variation exceeds this significantly, it is recommended to check alignment and ensure the chainring is properly centred on the crank spider.
Cost
CDX: High Performance
Chainring: US $70-110
Rohloff Cogs: US $93-105
Alfine Cogs: US $120-125
Pinion Chainring: US $154
Pinion Cogs: US $128-140
Belts: US $80-105
Kit Total Rohloff: from US $243
Kit Total Alfine: from US $270
Kit Total Pinion: from US $362
Belt Drive Touring Bike Manufacturers

Like the sound of belt drive? I’ve compiled a list of touring bike manufacturers HERE.
For those wanting to do a custom build, my list of touring frame manufacturers is found HERE. Expect to spend more than US $1000 / €1000 on a complete belted bike and a minimum of US $500 / €500 on a belted frameset.


Belters are awesome! Team this up with a 14-speed Rohloff hub and you’ll be cruising. I love the idea of it being quiet, smooth and low maintenance. I’d like to build a bike in the future with a IGH and a belt drive combo.
We’re hoping to be able to tour around the world problem free!
I am driving a Rohloff + Centertrack for half a year now, but the rear cog is pretty much worn out. I do ride a lot of mud nowadays… On average you can say I maybe ride 40Km a week, that just isn’t much.
That sounds like it has worn a bit quick… we have both completed well over 5000km on our Centretrack drive trains with no noticeable wear on the rear cog. The front chainring is loosing its anodising now, it will be interesting to see how many kilometres we can get out of it. Are you using the stainless steel cog?
Awesome info, thanks! A question: do you know the difference between the CDX and CDC systems?
Hi Paul. The only difference between CDC and CDX is the width of the belt. CDC is 10mm wide and designed for city riding, and CDX is 12mm wide and designed for a MTB application. Having said that, make sure you ride Centertrack; it is leaps and bounds better than the older system. Alex
Hi Alex – I have been researching my next bike for a few months now, over which time I’ve read a lot about the Gates Belt Drive, and for some reason only just found your article today – it’s by far the most informative article on the system I have come across.
I initially loved the idea of the Belt Drive but was then put off the system after reading what Thorn, a British manufacturer of touring bikes, think of it. I’ve since come back around to the idea a bit but it still bothers me that I haven’t seen most of the serious concerns raised by Thorn fully addressed properly elsewhere – which makes me wonder whether either Thorn are scaremongering or Belt Drive sellers are more interested to tapping into the low-maintenance market than selling something they genuinely believe in.
The article can be found here http://www.thorncycles.co.uk/thornpdf/ThornLivingWithARohloff.pdf on pages 18 and 19. I’d be really grateful for your views on Thorn’s concerns, specifically:
1. The supposedly expensive, difficult to find and heavy tool for removing the rear Belt Drive sprocket (I have been unable to find much/any corroborating info about this elsewhere).
2. The apparently delicate nature of the belt, both during use and during maintenance for punctures etc (specifically, the damage caused from stones, twigs, knocking the drive with your legs or against a post. The Gates manual apparently says you need to “make sure that no components or objects can come into contact with the belt”, which sounds a bit daft in a daily use bicycle).
3. Potential weakening of the right-hand rear chainstay from the frame split.
Thanks 🙂
Hi Kieran
I’m glad you’re looking at belts as an option – we have been running our Centertrack kit for a long time now without issue. We are wondering when something will fail, but we consider ourselves good guinea pigs given that we ride in all-weather conditions in lots of different countries.
My guess is that Thorn haven’t spent a good amount of time on belts! Thorn are pretty well known for being staunchly for or against different things – disc brakes on tandems for example. We take their somewhat extreme reactions to certain matters with a grain of salt… 😉
1. Regarding the rear sprocket, we do not carry a tool to take it off. But we don’t carry a chain whip when riding a chain driven bike either. Yes, it will be harder to take off our cog when we need to (realistically the tool will get sent from Germany to wherever we are), but we are gambling on the rear cog making it a long way yet.
2. As mentioned above, we haven’t had any problems with with our belts… although we do cringe when multiple people per day twist our belts in their fingers. Intrigued locals like to give them a good yank, and still everything works fine. Delicate? No less delicate than a chain in our opinion.
3. The only frames we recommend buying should be ‘Stiffness Test Approved’. I don’t think you’ll have any issues at the chain/seat stay with an approved frame that has been tested with the correct tool.
Regards
Alex
Wow thanks for your quick, informative (and diplomatic! 😉 ) reply on a year-old post!! You have almost completely set my mind at ease, especially as I don’t expect to do any touring.
I say almost, as regarding your answer to q.1 – I hear what you’re saying when out touring but is it at least reasonably easy for a normal user to get hold of a tool when you’re at home living in the developed world?
We keep tabs on comments on the site, and like to reply as quick as possible – otherwise we get stuck with a backlog!
It would be worth finding out who has tools near you. Like Thorn mentioned in their article, there may only be only one shop in your country which has the right tooling. But really, you won’t need to worry about taking your cog off for another 20000km+ – so maybe carbon drive will be available in more bike shops by then!
Ahh OK – that’d probably be at least 5 years for me then so yes, hopefully the tool would be more available!
If I may ask a couple of other things – regarding the frame stiffness in point 3, I had thought that was more to prevent the chain tension changing from moment to moment as the frame flexes, rather than to certify strength or point of material failure. Since a stiff material/join isn’t necessarily a strong one or one with a long fatigue life, do you know if this test includes a strength/fatigue test?
(I accept too that the strength of the chainstay join is dependent on a given manufacturer’s design of the join, so maybe some are plenty strong enough while some aren’t – I imagine that if it’s as strong, say, as an S&S coupler, it shouldn’t be an issue. Also, if it was an issue, I’d have thought you’d have had a frame failure by now with all the travelling you’re doing on the Belt Drive.)
Also, on a slightly different thing, I have been pondering the use of drop bars with Rohloff; I want Rohloff ideally, but have been considering the Alfine 11 as the idea of having to move my hands from the drops/hoods whenever I want to change gear seems a bit annoying. Maybe it’s not that bad but I would anyway like to have interrupter levers on the tops for negotiating traffic etc. During initial discussions with one of the manufacturers that have made my shortlist, though, they didn’t think that interrupter levers are long enough to clear the Giles Berthoud/Co-Motion drop bar shifters and, sure enough, all of the few interrupter levers I can find do look rather stubby. Have you any experience with this? Do you think it’s a workable option? Do you know of any levers that would meet my requirements?
I hope I’m not taking advantage of your helpfulness & hospitality by asking yet more questions! Forums are of limited use when trying to get authoritative answers and it’s great to be able to get unbiased information from somewhere; having stumbled directly onto this page from google I only just realised that you’re in the middle of a tour of Europe and the Middle East. It’s amazing how you’re managing to run such a detailed blog while on the go!
You’re correct – the stiffness test is just a test of stiffness and that doesn’t mean the frame is strong. Never mind my point.
From all I’ve seen on the internet, which is admittedly too much, I haven’t seen failures at the seatstay joins on belt frames. This doesn’t mean a frame with a split can break, of course, but I don’t think this should be a concern given how many belt drive bikes are around these days. Get your frame/bike from a reputable manufacturer backed with a good warranty and you should never need to worry.
We love questions! We are glad to be able to help, whether it be from home or on the road.
What is the proper procedure for getting a cdc belt to track straight. Mine has a tendency to track 5mm to the inside while the small cog is tracking straight.
Thank you for a proper article. Their seem to be plenty of opinions
about but little in the way of solid research. I’ve only just started
looking into belts but defiantly more intrigued now.
Glad we can help.
Hi
I bought bike with a belt drive.
On one of mine trip I had a silly accident:
Other belt from mine bike-bag get between wheel and belt. I did not see what actually happen under me but mine bike was stopped immidetaly! I look what happen and carbon belt was out of sprocket. I notice also that the belt hurt a little from the external side. But it was in one peace. I spent some time to get the belt on sprockets again. I start pedaling and belt simply rip off.
Next I had very long walk.
With the first opportunity I start to search for a new belt.
Well … believe me that getting carbon belt in Norway is almost a miracle.
I contact with Gates (manufacturer) and they give me price 110euro for belt and delivery.
why the hell I choose belt ?
It last much shorter than mine last cheapest chain.
Hello Lukas
Sorry to hear of your bad experience. I suggest that you take a closer look at your belt alignment and tension. It sounds like something isn’t set up properly which had caused your belt to jump off.
We have now completed over 25,000km on our current belt and are really happy with the longevity of the product – we’ve certainly never got this kind of distance out of a chain! As the belt is so lightweight (80g), we always carry a spare with us.
Alex
Yeah … that’s mine bad experience.
But it was setup correctly in Germany just before the trip.
But I do not give up. Since it was sort of accident I will give the second chance to carbon drive 😉
Awesome write up Alex! And a great, inspiring website too.
I’m having a titanium touring/mountain bike frame made up with provisions for the addition of a belt drive but am a little concerned about the noise created by grit and dust that you’ve mentioned. On the gates website they recommend cleaning the belt with water, letting it dry then lubricating with a dry silicone spray which should repel dust and elevate the noise problem. Did you try this? I know in the automotive industry it’s a standard technique used to deal with noisy belts.
*alleviate. Pretty sure you don’t want to elevate the noise problem!
Surprisingly, we haven’t tried silicone spray! It seems that the places that are sandiest are also the most remote – but thanks for bringing this information to the forefront of my mind. Will have to test it out soon.
Hi Alee, I’m having hard time with Gates carbon belt system. Do you know if CDX and CDC system are exchangable? I’m asking because I was so pissed off with belt alignemt of CDC (after every ride I couldn’t manage to keep the belt perfectly in line) that I decided to go for CDX system. I haven’t finished to install everythings yet because it looks like there’s a misalignment of about 3mm on belt center line between CDX rear and CDX front cog, and I can’t figured out why this happen. I’ve just replaced the old parts with new ones. Thanks for your tips. Roberto
Hi Roberto. I am not too sure of the particulars, but once you’ve got it all installed you’ll be able to get a better idea for how much difference there might actually be in the chain line. You should be able to add or subtract chainring or bottom bracket spacers to get the alignment perfect. Alee
Hi Alee, thanks for your infos. I wish Gates Carbon (Europe) would have warned me when I asked them the ordering part number for the CDX having already the CDC system installed. Anyway, your info is really useful. I thook a photo to show you better the situation. I’ve placed a long ruler on the front pulley and measured the misalignment on the rear cog. I have 8,10mm from the center line that means more than 3mm of misalignment.in the chain line.
Now because the internal hub is a shimano Alfine I don’t think I can shift the rear side. Can I??
I’m not even sure if I can play with bottom bracket spacers because as default my bike is already mounting two spacers (5mm total) on the not-drive side (I guess to get chain line with the old CDC). According to your experience do you think will be possible to add a spacer of 3 mm?? The crankset is a Truvativ fireX GXP.
Last option adding 3mm chainring on the spider, but here I don’t know the nuts will hold such big lengh. Gosh I’m feeling on the edge of a divorce with belt system.
Thanks for your advice
Roberto
Hi again. We had a couple of millimetres difference in chain line from the CDC to CDX. From memory I added a few millimetres to the bottom bracket on the drive side. It will take a bit of trial and error to get it perfect, so give it time! I don’t think you’ll need to divorce your belt setup just yet. We’ve done 26,000km on our current cogs and belt – the Centertrack system is a great!
Hi Alee, finally I could untie the knot of the chain line. I bought longer bolt but because they where too long I had to add double spacer (that weren’t so easy to find for the right thickness). In photos you can see all the stuff I bought to fix this issue. Anyway now everything is installed and looks it is working really good.
Because of the money I have spent for the chain line system (CDC and CDX) and time installing it I wish I will ride more that 50000Km without touching anything anymore.
Thanks for your information. I hope that it will be useful also for others riders.
Roberto
Hi is there any lighter crank arm/set ?
I’m not sure what you mean. You can use cranksets from almost any manufacturer with Carbon Drive, even the lightest in the world.
Alee.
Great write up and your forum support looks exemplary too. I just imported a Single speed Cx bike from the US with CDX Centretrack. I was looking for a low maintenance commuter for my 14 mile jaunt into London every day and couldn’t find anything in the UK without paying a bespoke-build fortune.. I love it so far. I do wonder though about what seems to be a ‘reasonable’ amount of resistance I feel when hand cranking the pedal on the work-stand. Noticeable even if cranking backwards with no resistance from cranking the spinning wheel around. The tension is OK according to my iphone app. Is this resistance normal? There is no running noise. What is your experience please? There are no belters in the UK to compare notes with!
Any help welcome.
If it’s running the right tension, then my advice is to leave it. That said, we run our belts slightly lower tension to reduce the resistance – we can get away with it on the touring tandem because we don’t accelerate hard too often. If you’re ‘just cruising’ and not taking off at the lights like a madman, you can technically get away with less tension.
Hi Alee,
I have a new Surly Troll frame which is suitable for a Rohloff IHG as it has horizontal rear drop outs and OEM 2 mounting plate. Originally I wanted to fit a Gates CDX Belt drive but got put off not knowing whether it was stiff enough or finding a suitable frame builder to modify it to include a break in the rear seat stay or modify the drop out to allow a belt to be fitted. First off is the Troll frame stiff enough and secondly is it easy to modify it to include a break for the belt?
I plan to put a Rohloff OEM TS disc brake (solid axle) hub into my Troll frame and then ride around the world. But to keep the best clean I am going to try to fit a full chain guard as I can’t even be doing with the cleaning that might be involved riding in really dire roads.
Thanks in advance for your help.
Hi Alex
Regarding stiffness, I am not actually sure what chainstay and seatstay tubing is used on the Troll. Perhaps email Surly asking for tubing specifications? Or alternatively, bring your frame to a reputable frame builder to get their opinion on the matter. My initial thoughts are that the Troll would be a fine candidate, given that it is designed with pannier bags in mind…
I would suggest putting a frame break into the seatstay rather than modifying the dropout. The dropout should stay one piece…
Don’t forget to check whether your chainstay length will be ok for the ratio you are thinking of using. You need to have 10mm in the dropout in order to get the wheel out, so the axle needs to sit at 429mm or further on the Troll. I had a look at the Gates Calculator (http://www.gatescarbondrive.com/Apps/DriveCalculator/index.html) and it seems that you could run a 2.5/1 ratio (same us my touring bikes) with a 115t belt. That gets me up most climbs fully loaded!
Alee
Hi There,
Santos, a very reputable Dutch manufacturer of trekking bikes and tandems has tested both belt systems and basically only sells the CDC belt because of higher durability. You can check this out on their website. http://www.santosbikes.com
Cheers,
Robert
I’m aware of that! This is at odds with the 31,000km we did on our Centertrack belt. No complaints about that kind of durability here. 🙂
I road my Van Nic Amazon over the Passage du Gois the other day. Because it’s a tidal causeway the road was pretty slick with sand/salt and other unmentionables. Once on mainland France and dried out the belt just got noisier and noisier to the point that I stopped pedalling as Lycra clad pro’s approached embarrassed by the racket I was making! Once back at base a couple of buckets of water and some WD40 around the bottom bracket had me back in stealth mode. However it got me through thinking…..
1) would it be ok to use sea water to wash away excess grit/sand? I have a titanium frame so why not?
2) are the bottom brackets/cogs on belt drives any more susceptible to ingress from gritty material than chain options? i.e. Can I be sure that the whirring racket I made was actually the brake and not cogs/bearings?
The part of France I’m in has lots of unsealed, but fairly well compacted cycle tracks and I was just wondering if anyone had any quick and very portable cures for a potential whaling banshee?
I have a dual CDX belt drive on my Co-Motion tandem with 11,000km on it. I just noticed that as the crank revolves the belt tension increases and decreases significantly and at the exact same point each time in the rotation. Additionally, when the timing belt gets tight, the drive belt goes more slack and vise versa. Any thoughts?? Thank you for your time.
Hi Dan. I’ve found that you’ll have tight/slack points on both belts; it seems to be normal. Make sure you adjust your rear eccentric bottom bracket first so that the point of maximum tension is within the right range on your drive belt. Then adjust your front EBB to get the right tension at the tightest point on your timing belt. You should roll happy once you’ve adjusted them well. Alee
Sorry about the late reply here, GCB. I don’t see why you couldn’t use salty water to take off the grit, but I’d perhaps use fresh water and a toothbrush when you can to make sure it is properly cleaned. One of the commenters here suggested that silicone spray is the best way to keep your belt completely silent – I still haven’t tried it yet, but I can’t imagine it damaging a belt in any case. A clean belt + some silicone is my recommendation for tidal causeways!
Hi
I need some help.I’m a little green on the whole belt drive stuff but have got a Scott Sub speed 10 ( with eliptical bottom bracket) It has an Alfine 8 speed. I think as standard it comes with a 46T front and 24 rear. Now the tricky bit, I want to use this off road and want a couple of gears better than 1:1 ( on a standard set up ) , for those tough climbs. so my question ( I have no idea how to work it out) I realise i’d probably have to change over to cdx as the bike has cdc but what front and rear cogs and belt do I need?
I hope you can help
Hi Nic. The limitation here isn’t the belt, but rather the amount of torque the Alfine 8 is capable of handling. Shimano’s lowest permitted ratio is 1.9:1, which is precisely what comes on the Scott Sub Speed 10. But that of course doesn’t mean you can’t do it anyway. Have a play with the drive calculator at the bottom of this page by throwing in the ratio you want, and your chainstay length (456mm): http://www.gatescarbondrive.com/Tech/Overview#
Thanks for the Info Alee if I use a 32 front CDX and 28 Rear ( not sure what fitting the rear is on the Scott I guess its 9 spline?) That works out at chain stay of 456.45mm and give 1:143 gear ratio which I guess is as close as I’ll get? Does the gear ratio refer to the lowest gear I can get with that combo? also what are the issues around going below Shimano’s permitted torque? Thanks
The largest Alfine rear sprocket is 26t (http://www.gatescarbondrive.com/products/cdxsprockets).
With the Alfine hub and your current external gear of 1.9:1, you can already achieve the equivalent of a 1:1 ratio in your first gear. In your 8th gear, you are pushing the equivalent of 3.1:1. Shimano doesn’t permit any smaller gears because it is much easier to damage the internal parts with higher torque loads from the low gears. My suggestion is that if you’re going to push the limits, only do it by a little bit. Going to 1:1.1 is definitely pushing too far! 😉
I’ve just replaced my first sprocket at about 12,000 miles (20,000 km).
I’d tightened the belt as it was a bit loose and noticed it noisily minced the belt before I realised that the sprocket was completely worn and the residual teeth really sharp. I suspect I should have changed the sprocket when I changed the first belt maybe at half the mileage.
Front cog looks pretty good.
Getting the sprocket off was difficult and required a large pipe wrench on the sprocket.
Unfortunately the sprocket carrier came away with it. Note then that the hub leaks oil if tilted.
I presume that for each new sprocket you need a new sprocket carrier (70 euros and 40 euros respectively) unless you can separate the sprocket and the carrier?
This is the second belt I’ve been through, although at the moment I’m not sure how worn they need to be before replacement and am learning on the go.
I commute year round in pretty filthy conditions.
There seems to be little information to be had on the internet.
Hi guys,
I ride a – don’t laugh – Decathlon B’Twin Tilt 700 – I said don’t laugh! – folding bike with a carbon belt drive. I’m not sure whether its an own brand decathlon belt drive or something else.
Anyway I was using it happily for about 6 months without issue until I started to get these weird sounds – like the sound of a comb being run up and down the side of your finger? Others say it sound slike creaking or a squelching rubber. Whatever, it was making a sound and more to the point there was a slight vibration on the right pedal.
Then on one commute home, on a slightly steep incline the belt snapped completely. Decathlon replaced it but looked baffled as to why it was making the noise or why the belt snapped.
An independent bike shop looked into it and said that there was a buildup of dirt on the crank which was causing the belt to possibly slip? Does anybody else have any further ideas as to why this is happening and what I can do to prevent the noise and damage to my new belt?
Hi Prestwick
There are a few things that you can do:
– Keep the belt and cogs clean – you can use silicone spray as a lubricant too if need be.
– Make sure the belt isn’t over tensioned. Rotate the crank all the way around, checking for tight spots.
– Check the belt is aligned well. I’ve experienced the comb-on-fingers sound on slightly out of line belts. If it looks like the belt is pushing towards one side, you can add or remove bottom bracket spacers (or chainring spacers) to get the right spacing.
Alee
Hi Alee,
Congratulations on such an informative site. Very refreshing! I have a couple of CDX related questions that i was hoping to get answers on. I really hope you can help. Im off on my 4th long European tour imminently on my Koga/Rohloff/Gates setup. Very happy with the system so far but as i plan to be away much longer this time ( 6months+ ) i am thinking to take a spare belt with me just in case. My first question is: If coiled up correctly can the belt just live in my pannier for months on end without it affecting the carbon fibres?
My second question is: In the event of a problem with any part of the Gates Drivetrain what would you recommend to be the best course of action whilst on tour, contact gates? Search for the nearest Bike shop that deals with Belt driven bikes? Like most long distance tourers using new technology my paranoid mind envisages me high in the mountains in a remote region of a country not reknowned for having good bike shops, with a failed Drivetrain! Any tips would be greatly appreciated. I know i should have faith in the technology but i also like to have backup plans at least half thought out before i go.
Thanks for your time. I hope to hear from you very soon as i leave in a couple of days.
All the best ………………………..
Hi Tom
Thanks for the kind words!
I kept three belts (two standard and a tandem belt) in the small inside pockets of my Ortlieb panniers on my multi-year adventure. I only got to use a spare for the last 1000km in the end, but better safe than sorry! With them folded up in a bag, it’s pretty hard to bend them so much you damage the fibres.
With regards to damaged drivetrain, I honestly wouldn’t worry. The rear cog is made out of stainless steel and I can’t even imagine what it would take to damage it. The front chainring is made out of some pretty solid aluminium – mine took some hits when lifting my bike over things, without any consequence. If you wanted to feel at ease, take a spare chainring, but remember that it’s pretty easy to get stuff posted within Europe.
Have a great trip!
Alee
Hey Alee
Thanks for such a swift response. I still haven’t heard back from gates regarding the same questions. It’s great to get real world advice about the technology from the touring perspective as the Internet can generally be a bit of a minefield when you’re looking for a very specific answer to something. Nobody around where I live, bike shops included, have even heard of gates! So thanks for putting yourself out there as a willing resource
I enjoyed very much your Co-motion/pinion article and the whole “basically please just give me one” undercurrent! In a way I kind of want bike drivetrain technology to slow down a bit so I can enjoy my rohloff for longer before the inevitable purchase of a pinion!
Anyway, 3 spare belts! I thought I was mental taking just one. Now I will take one without fear. Sorry to take up your time but I hope you could answer just a couple more questions for me?
1) i watched the gates video on how to coil up a belt ( mine came flat ) and although it looks simple enough they do make you feel that if you do it even slightly wrong then not only will your belt crumble to dust but your whole touring setup will explode and you will die alone in a ditch. You got any pointers on coiling it up?
2) regards tight spots on the belt gates say that anything significantly over a 10-15hz difference between lowest and highest frequency reading when using the app, means the front ring will need centering or something. I can get discrepancies of 25hz when checking the tension, but the belt is quiet, doesn’t jump and seems to perform as it should. Do you think I should just leave it and have faith? In back to back tension tests (out of sheer curiosity) before and after riding i take a frequency reading every quarter turn of the crank until the whole belt has been covered and it always gives me an average of 45hz. I called Velorution ( uk main distributor for gates ) about how to best use the app and they said they don’t even bother tension testing anymore! They simply press down on the belt and without excessive force it shouldn’t move more than 10mm. It all sounds a bit vague these tensioning issues. I don’t want to buy a tension gauge device and I have a feeling you’ll probably be of the opinion that if it’s performing well then just leave it alone! Just wondering what your thoughts are on this.
well that’s a very long post, sorry!
All the best to you and hope to hear from you soon, tom from Devon uk.
Hi Tom
When I was researching belts myself, there was nothing out there. So I decided to just create all the content myself! That’s how most of the stuff on this site ends up being here… 🙂
Coiling a belt should feel natural. Just twist it into a figure eight, and it should naturally want to go into a coil. The main thing you need to be aware of is that if you ‘kink’ the belt at any time, the carbon can be compromised. That’s pretty hard to do when coiling it up.
With regards to tension, I tend to agree with Velorution in that you can easily go by feel – 10mm seems about right! You will find tight spots in your drivetrain, and getting the front chainring as centred as possible will minimise those. Once I’m within a range where the belt feels light, but not loose, I only tension my belt if I experience slippage on the rear cog. So basically, you don’t need a gauge!
Alee
Thanks so much alee, your advice is very much appreciated and reassuring. Gates got back to me about coiling the belt up and a guy from gates Europe even made a quick video of him coiling and Un-coiling a belt, slamming it down onto the table after each coil and doing it very fast. I guess they’re not made of egg shell after all!
They didn’t get back to me about the best course of action to take in the event of needing spare parts/repairs etc though. I guess I just call gates Europe in Germany and take it from there. Out of interest, if you were in Europe and needed gates assistance, who would YOU call? ( except the ghostbusters of course ) .
All the best once again
Tom
I’d probably place an order for new parts through Bike24 for the quickest turn around. https://www.bike24.com/1.php?content=13&search=gates+carbon
If it’s a genuine warranty issue though, Gates Europe should be able to help you out!
I love my quiet belt but I was wondering if it is normal to have a little play before the belt engages?
All of mine engage straight away. I don’t think that’s normal!
Hi Alee,
Great post but some of the things you wright down aren’t completely correct. The price of the CDC is still a lot lower. In the EU for a cog it’s about €30 lower in price, in total you pay about €100 less than the CDX version.
At our bike shop we sell and maintain both systems equiped with Rohloff. We do sell Santos bikes, Surly and our own Titanium brand. What we noticed in these couple of years is that the CDX wears out a lot faster than the original CDC. Even with the renewed CDX belts and cogs.
We do have customers who can put a lot of milage with the CDX version but the CDC version still wins this. Only problem with CDC is that your frame has to be stiff enough to keep the belt turning nice, straight and smooth.
Millage done with the CDC version without breaking: 41 000 km (only replaced to keep a safe riding)
Also Santos bikes has done long term tests of both systems right now with some bike travelers like the bicycle junkies. They came to the same conclusion with their belts.
One note, when you put to less tension on the belt for the CDX than the cut out between the teeth wears out very very fast within several km’s you can completely ruin your belt. That didn’t happen with the CDC belt, you will have a faster wear out, but the CDC wil slide form it’s chain rings and riding is over so you know you have to put more tension on it.
We do still prefer CDC at our shop, even with the new CDX version of the belt and yes even for offroad riding… I may suggest that you look at the bike’s specs. Stiffness of frame is one important factor to decide between CDC or CDX.
So at the price point your article isn’t correct, at the point of tear and wear. Maybe, but we see different facts.
One advice, when you decide to change the belt after it’s wear out than we advice to change the cogs as well. A slightly worn out cog makes the belt wear out much much faster (so there won’t be a profit in comparison with chains any more), when you change the whole setup you can ride safely a lot of millage without thinking of your setup when installed correctly. It will cost you some money, but you will be very happy when doing this.
Cheers,
Koen
Why is not possible or, at least, usual to put a dynamic tensioner for the belt as well as for chain drive? I think that it should be more eficient that apply so much preload.
Thanks!
I don’t know for sure, but I’d say that it has to do with belt tension. The Carbon Belts need to be very tight!
Hi Koen
Thanks for providing your experience! This article is due for an update, so your comments are very timely. The update will include current pricing (which is lowering with time).
I find it quite interesting that Santos has found the opposite to my observations with regards to belt longevity. I can’t argue with their findings or yours – I can only provide my own experience. Maybe I should switch back to the CDC belt again to see if I can get better milage?
Alee
Sounds like there are significant issues remaining with this technology. 🙁
Special frames, tight-tolerances, excessively sensitive to environment,
and finally… expensive. The constant cleaning, to me, implies that
maintenance is higher in some cases than for a conventional chain-type drive.
Also, when was a properly maintained chain loud? I think a lot of people hear their worn out/misaligned rear mech and think that’s the chain! All I hear on my bike is wind noise. Joggers too–had to install a bell. Same for the tandem.
Getting 31k-KM out of a belt would be the equivalent to just 2 chains
for me. I replace chains at 0.75% with a CC-3.2, and have yet to need to
replace cogs or chain rings. That’s only about $100(usd) of chains…
adding the lube would be, at most, an additional $40 or so. (and that’s a lot of lube, doubt I use that much!) That’s about $150 (USD) for 31kKM. The belt is about $75 (again USD)… so less than $75 in savings matched to the chain-setup.
However, there are significant problems with the rest of the belt-system’s drivetrain technology… cogs and rings don’t seem to routinely outlast the second belt… so, in total.. the belt systems are _much_more_expensive_ than chains to maintain… however, if we isolate to just chain and belt costs, there is about a $75 advantage… until you have to scrap the whole $300+ system and start over–assuming you don’t destroy your IGH… which appears to be a fairly common victim of belt problems.
I think the lessons learned from belt drives in the motorcycle-world may also be applicable… they also complain of noise and their belt life is only about 2x that of a chain… and the repairs are equally expensive when they get sand in their drives… which seems to match what I read here… Although, a lot of belt driven motorcycles get far less travel distance than my pedal-bike does.
So, for the low-mileage crowd, the belt may make good sense?
It is interesting to see people here seems to prefer the newer CDX Centertrack over the original CDC Mudport belts and sprockets.
I have two bikes with both belts and love the CDC more than the CDX as the CDX once a while makes noise because it seems the centre of the sprocket touches the belt. Never experienced that for the CDC.
That is only one observation but here in the Netherlands, most of the professional bike builders seems to favor CDC over CDX, see for instance Riemaandrijving on santosbikes.com
The Gates belt system is obviously not for you.
Really sorry for the late reply. Thanks very much for your advice and suggestions. Unfortunately in the last 2 years life has got in the way and this project has not progressed, but it will hopefully do so soon.
I am thinking about changing out my CDC on a Scott Sub 10 to CDX as I have cracked the rear sprocket after about 4000 kms and the belt won’t stay on. Is it possible to put spacers on the rear axel on the Alfine instead of the crank? The front sprocket is close to the frame already.
Hi Greg, I think you will have interferences with the frame, but from a functional point of view there’s no drawback for adding some spacers.
My wife has a CDX on her Trek Soho that the Gates calculator says should fit and it has a faster gear ratio (2.5) than mine (1.9) which I would love to change as it is generally flat here. Going to see if it will fit before I buy. In the meantime my LBS put a chain on for only $50CND, so as for the cost comparison for me the chain wins, but I will go back to a belt for the low maintenance, no worry about calf tattoo when I get to work, and the superficial appearance of the red CDX belt on my red and white Scott.
Nic,
Did you upgrade to CDX? I cracked my back CDC sprocket and would like to upgrade but it’s flat here so I want to go from 1.9:1 to 2.5:1 as I never go below 4th. FYI for others reading this the Alfine 8 is 1:1 in 5th.
Salve, posso chiedere: quanto sono limitato nel numero dei rapporti tra cinghia e catena con Roholoff?
Per grandi salite, viaggi in zone montuose è meglio belt o chain su Roholoff?
Quali aziende producono telai compatibili per cinghia roholoff? Quali mi consigliate?
Soma Wolverine, SURLY ECR, altri, and?
Grazie,
Alberto.
Hello,
The snub wheel on my carbon belt has just given up the ghost, Near as I can figure there were two ball bearings held in place by spring. what I can’t guess at is how this spring was held in place as the retaining hole has no sign of cap and there are is no sign of threading for a possible holding bolt. I have searched the internet but can find no where to buy a replacement wheel kit.
I bought a new Marin Fairfax SC4 with the gates belt drive. I’ve only ridden about 1800km on it, but one of the teeth has broken off the back sprocket already. It kind of looks like the belt doesn’t fit the sprocket right, like a stretched chain, but I don’t see how that could be. Any idea what would cause a tooth to break off? Is the belt too loose? The dealer told me not to tighten it anymore then they had it.